Hi Friends,
I can't begin to tell you all how far along with wedding crafts I am. I feel like I am really getting organized and ready to do the large scale supply buy. I have made a lot of samples for Sam to look at and one by one final choices are being made. We wanted to make a wine and cheese basket as a favor or take home snack for after the reception. I was all over this one from the onset. My work peeps we too, telling me it was cost exorbitant. I laughed and said you're joking, I could bring this baby in for $8 each. Yeah well the joke is on me, because 1 mini wine bottle turned in to 2. 1 piece of cheese turned in to a piece of cheese and a mini summer sausage. The hershey nuggets became Ghiradelli. We had to add a charm to each wine bottle. The saltine crackers became Carr's crackers. The basket filler went from shreds from the dollar store to custom shredded Stampin Up Cherry Cobbler cardstock. I could go on and on. I don't even want to mention that the berry basket paper went from SU black cardstock to this awesome shimmer paper that is imported from Italy and purchased from LCI paper. That happened when we decided the basket paper needed to match the invitation paper. Sure . . . sure you want me to tell you how it all priced out in the end. Well all I have to say is . . . Can we really put a price on the smile on my and my daughters face? I do so hope you are laughing along with me and not shaking your head at how crafty crazy I am. I can't even tell you the full price out because I still have not packaged it under cello or made the outter tag. Plus you know I have to add some ribbon to the outside too. Oh well this is me, always was and always will be! So I have the berry basket file for you today. First off here is a picture of the file:
If you would like this file the PDF is here:
http://www.mediafire.com/view/lxfb54fbnd7j5vf/berry_basket_for_upload_with_notes.pdf
If you prefer the MTC file you will find it here it does not have score lines on the top strip:
http://www.mediafire.com/download/akbhww7ejgr40e8/berry_basket_mtc_for_upload.mtc
I also want to show you a picture of the cheese board with the kids name and wedding date added here is that picture:
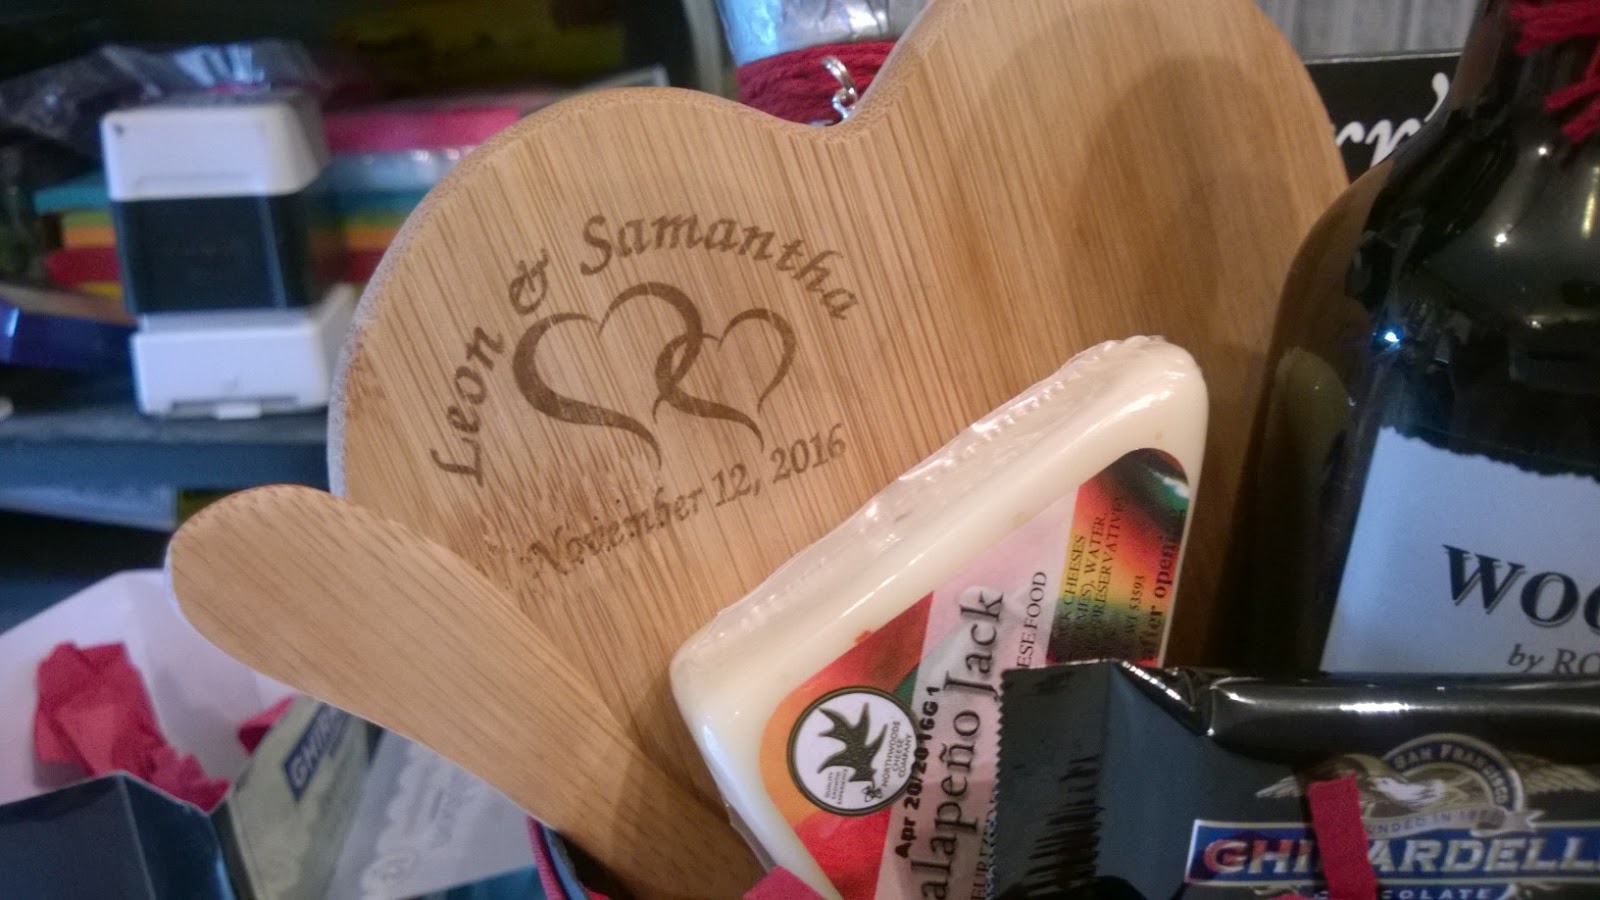
The pictures of things you see along the way are all from the samples I have been making. All of the ribbon has now been changed out from Stampin Up Cherry Cobbler to Offray Sherry in satin. The Stampin Up linen and seam binding ribbon was just freying to easily. I could seal the edge of the linen but not the seam binding. Plus the shine of the satin is much nicer. The tealight place card holders look so much better with the ribbon change out.
I will be making the final samples of everything from the invites to the basket in the course of the next few weeks so that I can get my supply lists ready. Wish me luck, the craftroom will surly be hopping! Thanks for stopping by,
Lysa
Showing posts with label MTC. Show all posts
Saturday, July 11, 2015
Sunday, February 8, 2015
Valentine's For School 2015 - What To Do, What To Do!
Hi Friends,
One week before Valentine's Day and I haven't even thought of what I am bringing in for the work peeps. More important than that was what is Rory going to do for school. Now that brings in a whole new question. New school, now Middle School, should I, should I not? That was the question asked by the little one. Still young and wanting to make any occasion fun, but savvy enough to not want to appear a bit corny. Well, Nonna has the answer and here it is: "To thine own self be true, and be like all good Girl Scouts and be prepared." I suggested that we make a nice Valentine treat that would fit in her backpack. She would be prepared and if she felt uncomfortable handing them out, well in the backpack they would stay. No harm, No foul! The best of both sides of a story if you ask me. Gee, I am getting wise as I push 60! So we chose some Valentine's themed pencils from Walgreens and a Dove chocolate heart. We chose a push pencil and Dove chocolate as perhaps they are just a bit more appealing to the "more mature audience" that we are making them for. No Monster High or Spiderman involved (It's the Dove chocolate heart that steps it up)! I really do think Middle School is on the tough side, but hey if you make it through you can most likely survive whatever life throws at you. So here are a few pics of this easy peasy favor that should please anyone. In fact I just may be making these for work as well. After all who doesn't need a pencil?
I made the page of tags using CAP2 and we punched them out with the Stampin' Up heart punch. I used my ZING and MTC to cut the shadow heart. The cello bags are from Stampin' Up. The white rubber bands are Rainbow Loom. I use those bands for all sorts of things!
Here they are in a vase by the front door until she takes them to school. Let's hope not to many peeps stop by for a visit because who could resist saying "help yourself"!
So easy, all we did was bag up the pencil and trim the bag to about 1.5 inches above the top of the pencil. Grabbed a chocolate heart and wrapped it in a 5 inch square of white tulle and secured it to the pencil bag with a white rubber band. We punched a 1/8 inch hold in the tag and made an angle cut into the hole and stretched the rubber band to lock the tag on. They came out great. We made 16 in about 40 minutes or so. Here is one more picture:
I hope Rory ends up passing these out but worst comes to worst we will have a few extra pencils in the house and some darn good chocolate too!
Thanks for stopping by,
Lysa
One week before Valentine's Day and I haven't even thought of what I am bringing in for the work peeps. More important than that was what is Rory going to do for school. Now that brings in a whole new question. New school, now Middle School, should I, should I not? That was the question asked by the little one. Still young and wanting to make any occasion fun, but savvy enough to not want to appear a bit corny. Well, Nonna has the answer and here it is: "To thine own self be true, and be like all good Girl Scouts and be prepared." I suggested that we make a nice Valentine treat that would fit in her backpack. She would be prepared and if she felt uncomfortable handing them out, well in the backpack they would stay. No harm, No foul! The best of both sides of a story if you ask me. Gee, I am getting wise as I push 60! So we chose some Valentine's themed pencils from Walgreens and a Dove chocolate heart. We chose a push pencil and Dove chocolate as perhaps they are just a bit more appealing to the "more mature audience" that we are making them for. No Monster High or Spiderman involved (It's the Dove chocolate heart that steps it up)! I really do think Middle School is on the tough side, but hey if you make it through you can most likely survive whatever life throws at you. So here are a few pics of this easy peasy favor that should please anyone. In fact I just may be making these for work as well. After all who doesn't need a pencil?
I made the page of tags using CAP2 and we punched them out with the Stampin' Up heart punch. I used my ZING and MTC to cut the shadow heart. The cello bags are from Stampin' Up. The white rubber bands are Rainbow Loom. I use those bands for all sorts of things!
Here they are in a vase by the front door until she takes them to school. Let's hope not to many peeps stop by for a visit because who could resist saying "help yourself"!
So easy, all we did was bag up the pencil and trim the bag to about 1.5 inches above the top of the pencil. Grabbed a chocolate heart and wrapped it in a 5 inch square of white tulle and secured it to the pencil bag with a white rubber band. We punched a 1/8 inch hold in the tag and made an angle cut into the hole and stretched the rubber band to lock the tag on. They came out great. We made 16 in about 40 minutes or so. Here is one more picture:
I hope Rory ends up passing these out but worst comes to worst we will have a few extra pencils in the house and some darn good chocolate too!
Thanks for stopping by,
Lysa
Sunday, October 26, 2014
Lip Balm Holder for Halloween 2014
Hi Everyone,
I am so happy to say my final Halloween favors are done. As you know my most favorite non candy favors are made with AVON products. I love their lip balms and hand creams for crafting. I am almost always able to purchase them for .79 cents or so. I also like to buy from AVON as I have a co-worker who is an AVON lady and I would much rather support her than Dollar Tree. I used CraftArtistist2 to design the file and I used my Zing and MTC software to cut them out. The pumpkin and bat are Martha Stewart punches that I have had for years. Don't you just love when you spend money on something and you use it for years! I also printed all the paper using Stampin' Up digital files. I buy all my favorite papers as digi files because as you know once they retire they are gone. The pumpkin paper is from the "Cast A Spell" DSP line from back in either '09 or maybe '10. I still use it all the time because I love it so much. Here is a picture of the pdf file share for these quick and easy favors:
You can find the PDF file here at this link:
http://www.mediafire.com/view/r5hf80cw3mmtr58/lip_balm_holder_halloween_2014with_photo_and_tips.pdf
and the MTC file can be found using this link:
http://www.mediafire.com/download/n02t6gc70vcxz7i/apothacary_lip_holder.mtc
Here is a picture of the lip balm holders and whats left of the little jack o' lantern boxes waiting to be handed out at work next week:
So to sum up Halloween 2014, I think my favorite favor was the beaded spider. I made so many of them and could have kept going if I had more peeps that I wanted to give them to. He may resurface this Christmas as "The Christmas Spider" from the Ukrainian legend. Next week I will be on vacation from work for a few days and all the Halloween paper gets put away and out comes all the Christmas craft supplies. I can't wait for this years Christmas crafting season as I bought some great Stampin' Up paper and supplies. They did a lot with Kraft paper and boxes this year. Kraft is my all time favorite for Christmas. Thanks for pit stopping my blog and I hope to see you again soon. Enjoy Halloween!!
Lysa
I am so happy to say my final Halloween favors are done. As you know my most favorite non candy favors are made with AVON products. I love their lip balms and hand creams for crafting. I am almost always able to purchase them for .79 cents or so. I also like to buy from AVON as I have a co-worker who is an AVON lady and I would much rather support her than Dollar Tree. I used CraftArtistist2 to design the file and I used my Zing and MTC software to cut them out. The pumpkin and bat are Martha Stewart punches that I have had for years. Don't you just love when you spend money on something and you use it for years! I also printed all the paper using Stampin' Up digital files. I buy all my favorite papers as digi files because as you know once they retire they are gone. The pumpkin paper is from the "Cast A Spell" DSP line from back in either '09 or maybe '10. I still use it all the time because I love it so much. Here is a picture of the pdf file share for these quick and easy favors:
You can find the PDF file here at this link:
http://www.mediafire.com/view/r5hf80cw3mmtr58/lip_balm_holder_halloween_2014with_photo_and_tips.pdf
and the MTC file can be found using this link:
http://www.mediafire.com/download/n02t6gc70vcxz7i/apothacary_lip_holder.mtc
Here is a picture of the lip balm holders and whats left of the little jack o' lantern boxes waiting to be handed out at work next week:
So to sum up Halloween 2014, I think my favorite favor was the beaded spider. I made so many of them and could have kept going if I had more peeps that I wanted to give them to. He may resurface this Christmas as "The Christmas Spider" from the Ukrainian legend. Next week I will be on vacation from work for a few days and all the Halloween paper gets put away and out comes all the Christmas craft supplies. I can't wait for this years Christmas crafting season as I bought some great Stampin' Up paper and supplies. They did a lot with Kraft paper and boxes this year. Kraft is my all time favorite for Christmas. Thanks for pit stopping my blog and I hope to see you again soon. Enjoy Halloween!!
Lysa
Saturday, September 27, 2014
Halloween Is In The House!
Hi Everyone,
The past week has been so crazy busy that I barely had time to play in the craft room. The whole living room and dining room are glowing in black and orange and we are totally ready for Halloween. Rory and I made a new banner for the mantle way back in September. It was the last day of summer vacation and I have had it hanging off the china cabinet since then. It looked so silly amongst the summer patriotic decorations. I am sure everyone who stopped by thought I was a bit off my rocker. I did have a hard time getting good pictures (as usual) but I thought I would post them anyway. I think Rory and I did a great job. Here is the picture:
Well, that is really a better picture of Rory than the banner! Maybe this one is a bit better:
and here is a close up of the letter S, I was glad I could catch a bit of the gold sparkle:
So here is our crafty recipe: The banner base pieces are from the Stampin Up banner kit called chalkboard. The DSP layer is from SU's cast a spell from years ago. I have the digital file so we printed the paper using CraftArtistPro2. The stars and the medallions were also made and printed with CAP2 and we used the Brother SnC to cut them out. I made so many of the stars and I still want to make more. The letters and shadows were cut with my Zing through make the cut. I love watching Rory use the computer and the die cutters. She really is a wiz with the Zing. If you look closely behind the letters you can see we added an embossed piece. We used our sizzix and a cuttlebug embossing folder of a web. Last but not least we even used my favorite Martha Stewart bat punch for the little bats. Each piece is sprayed with champagne mist so it sparkles. Wow, that's is a lot of product. But worth it for sure. We did not plan to hang this in front of the mirror but it was so long that this was the only place we could put it. So if I had to change one thing, I would have made sure that the backs of the pieces were black. I think that the chipboard reflection makes for an unfinished look. All in all we love how are banner came out. Today I have to finish some craft kits for Rory's friends that are coming over for a little celebration. The girls will be making the paper pumpkins that I made last year. We needed a quick and easy craft to do and this is perfect. Here is a peek at the project and the kits:
Don't the kits look great in the Stampin Up cases?? Have a great weekend and thanks for stopping by,
Lysa
The past week has been so crazy busy that I barely had time to play in the craft room. The whole living room and dining room are glowing in black and orange and we are totally ready for Halloween. Rory and I made a new banner for the mantle way back in September. It was the last day of summer vacation and I have had it hanging off the china cabinet since then. It looked so silly amongst the summer patriotic decorations. I am sure everyone who stopped by thought I was a bit off my rocker. I did have a hard time getting good pictures (as usual) but I thought I would post them anyway. I think Rory and I did a great job. Here is the picture:
Well, that is really a better picture of Rory than the banner! Maybe this one is a bit better:
and here is a close up of the letter S, I was glad I could catch a bit of the gold sparkle:
So here is our crafty recipe: The banner base pieces are from the Stampin Up banner kit called chalkboard. The DSP layer is from SU's cast a spell from years ago. I have the digital file so we printed the paper using CraftArtistPro2. The stars and the medallions were also made and printed with CAP2 and we used the Brother SnC to cut them out. I made so many of the stars and I still want to make more. The letters and shadows were cut with my Zing through make the cut. I love watching Rory use the computer and the die cutters. She really is a wiz with the Zing. If you look closely behind the letters you can see we added an embossed piece. We used our sizzix and a cuttlebug embossing folder of a web. Last but not least we even used my favorite Martha Stewart bat punch for the little bats. Each piece is sprayed with champagne mist so it sparkles. Wow, that's is a lot of product. But worth it for sure. We did not plan to hang this in front of the mirror but it was so long that this was the only place we could put it. So if I had to change one thing, I would have made sure that the backs of the pieces were black. I think that the chipboard reflection makes for an unfinished look. All in all we love how are banner came out. Today I have to finish some craft kits for Rory's friends that are coming over for a little celebration. The girls will be making the paper pumpkins that I made last year. We needed a quick and easy craft to do and this is perfect. Here is a peek at the project and the kits:
Don't the kits look great in the Stampin Up cases?? Have a great weekend and thanks for stopping by,
Lysa
Labels:
banners,
CAP2,
Halloween,
MTC,
Scan n Cut,
Stampin' Up,
ZING
Wednesday, September 17, 2014
Halloween 2014 Favor Box
Hi Friends,
Well don't you know Halloween is coming fast and furious. I could not believe when I got to work today and the first time I typed the date this morning I thought to myself "How the heck did we get to Sept. 17th!" Time is surely slipping past me. So this weekend I am taking down all the summer/patriotic decorations in the hope that I can get Halloween up the following weekend. I made my annual speech to the family about how I was going to scale it back. I say the same thing every year. "No bales of hay, Not taking out the Halloween dishes, Not going to put up the 5 foot twisted wire Dept. 56 tree . . . etc" and then every year I do the exact opposite and put up pretty much every single decoration I have. Well, that would be me. Say one thing and do the other. So today I have for you this years candy favor. I cased it from Stampin Up. You know they came out with the curvey keepsake die. Which I think is kind of a blast from the past as this little bon-bon box has been around forever and a day. I have it as a .gsd file from my Wishblade years! Now what got me was you have to cut it in 2 pieces. Which is great when you want to make it with 2 patterns. Plus it does save a bit on paper as you can cut it with half of a sheet of 12X12. My problem is I really don't like the way it goes together and it was just a bit to big for me. I have to make about 30 or so of these so I need to take candy cost in to consideration. As it is I went with Hershey Kisses instead of my normal Hershey Nuggets. I created the pattern where the base was 2 inches and it was huge so I shrunk it down to my liking. I used my CraftArtist2 to draw the box and exported it to a .pdf file so that I could cut it with my Zing using MTC. I saw these pumpkins all over Pinterest and thought they were so cute. I see SU peeps are making Frankie and Vampires and all sorts of cuties. I even saw a penguin. I loved them all and thought I would share my file with all of my digi cutting friends. Here is a picture of the pdf file:
For those of you who want the PDF you can find it here:
http://www.mediafire.com/view/8e9iqkb93h8a92z/bonbon_box_with_pic_2014.pdf
And the MTC file is here, I have included the faces and the leaves with the MTC file:
http://www.mediafire.com/download/vu58hx4v42c1y9x/curvey_box__share.mtc
I hope you like this file and I think at Christmas you can make some really cute boxes by adding a cut out window. If you need this box to be larger you can easily resize to your need. Hope to be back with a picture of Rory and my banner that we made in the next day or so. It came out great and I can't wait to see it hanging with all the other decorations. Please let me know if you have any problems with the file.
Thanks for visiting,
Lysa
Well don't you know Halloween is coming fast and furious. I could not believe when I got to work today and the first time I typed the date this morning I thought to myself "How the heck did we get to Sept. 17th!" Time is surely slipping past me. So this weekend I am taking down all the summer/patriotic decorations in the hope that I can get Halloween up the following weekend. I made my annual speech to the family about how I was going to scale it back. I say the same thing every year. "No bales of hay, Not taking out the Halloween dishes, Not going to put up the 5 foot twisted wire Dept. 56 tree . . . etc" and then every year I do the exact opposite and put up pretty much every single decoration I have. Well, that would be me. Say one thing and do the other. So today I have for you this years candy favor. I cased it from Stampin Up. You know they came out with the curvey keepsake die. Which I think is kind of a blast from the past as this little bon-bon box has been around forever and a day. I have it as a .gsd file from my Wishblade years! Now what got me was you have to cut it in 2 pieces. Which is great when you want to make it with 2 patterns. Plus it does save a bit on paper as you can cut it with half of a sheet of 12X12. My problem is I really don't like the way it goes together and it was just a bit to big for me. I have to make about 30 or so of these so I need to take candy cost in to consideration. As it is I went with Hershey Kisses instead of my normal Hershey Nuggets. I created the pattern where the base was 2 inches and it was huge so I shrunk it down to my liking. I used my CraftArtist2 to draw the box and exported it to a .pdf file so that I could cut it with my Zing using MTC. I saw these pumpkins all over Pinterest and thought they were so cute. I see SU peeps are making Frankie and Vampires and all sorts of cuties. I even saw a penguin. I loved them all and thought I would share my file with all of my digi cutting friends. Here is a picture of the pdf file:
For those of you who want the PDF you can find it here:
http://www.mediafire.com/view/8e9iqkb93h8a92z/bonbon_box_with_pic_2014.pdf
And the MTC file is here, I have included the faces and the leaves with the MTC file:
http://www.mediafire.com/download/vu58hx4v42c1y9x/curvey_box__share.mtc
I hope you like this file and I think at Christmas you can make some really cute boxes by adding a cut out window. If you need this box to be larger you can easily resize to your need. Hope to be back with a picture of Rory and my banner that we made in the next day or so. It came out great and I can't wait to see it hanging with all the other decorations. Please let me know if you have any problems with the file.
Thanks for visiting,
Lysa
Saturday, April 5, 2014
Our Easter Banner
Hi Everyone,
Just a quick pit stop to the blog to post a picture of the Easter banner Rory and I made last weekend. Every time Rory comes to play in the craftroom something crafty good happens. I just love when we are getting our craft on together. We started by looking at pictures on Pinterest of Easter banners and Rory fell in love with one that used carrot shapes. Once we had decided that was our inspiration everything fell into place easy peasy. Once I grabbed some cut files from my digital stash we were off and running. The Zing and MTC made quick work for cutting out our shapes. Here is a picture of everything lined up:
Right before we started to assemble the banner, Rory took the time to ink the edges of everything. What a difference the shadowing makes. It really brings things to life. I always like to grab a few pictures of her working.
Once the inking was all done we ran the cuts through the Xyron. It is our favorite adhesive as you may know. We used glue dots to attach the green carrot tops in between the front and back layer of the carrot. The letters are popped up with pop dots to add a bit of dimension. We chose a natural raffia for stringing the banner together and here is how it came out:
Wow, it looks like we our ready for a visit from the Easter Bunny! We had a blast making this. I have to say that we do well working together. I like that we started by using the computer to plan our project. I like seeing Rory working with MTC software. Once laid out on the mat you can really get a sense of size and the look of the complete project. I like that Rory is able to get a feel and understanding of vector plotting. I see these as skills that may come in handy someday. You know I want a 3-D printer and if we ever get one I know she will be able to use it. I like that we move from technology to a handcraft. It is a great experience to bring a flat piece of paper to life. I think Rory can see it is important to use all the resources available to get to a final product. I hope you all like our banner and stop back soon as I hope to get a handle on the 25 little Lindt bunnies I bought. Have a great weekend and thanks for visiting,
Lysa
Just a quick pit stop to the blog to post a picture of the Easter banner Rory and I made last weekend. Every time Rory comes to play in the craftroom something crafty good happens. I just love when we are getting our craft on together. We started by looking at pictures on Pinterest of Easter banners and Rory fell in love with one that used carrot shapes. Once we had decided that was our inspiration everything fell into place easy peasy. Once I grabbed some cut files from my digital stash we were off and running. The Zing and MTC made quick work for cutting out our shapes. Here is a picture of everything lined up:
Right before we started to assemble the banner, Rory took the time to ink the edges of everything. What a difference the shadowing makes. It really brings things to life. I always like to grab a few pictures of her working.
Wow, it looks like we our ready for a visit from the Easter Bunny! We had a blast making this. I have to say that we do well working together. I like that we started by using the computer to plan our project. I like seeing Rory working with MTC software. Once laid out on the mat you can really get a sense of size and the look of the complete project. I like that Rory is able to get a feel and understanding of vector plotting. I see these as skills that may come in handy someday. You know I want a 3-D printer and if we ever get one I know she will be able to use it. I like that we move from technology to a handcraft. It is a great experience to bring a flat piece of paper to life. I think Rory can see it is important to use all the resources available to get to a final product. I hope you all like our banner and stop back soon as I hope to get a handle on the 25 little Lindt bunnies I bought. Have a great weekend and thanks for visiting,
Lysa
Saturday, February 1, 2014
Itty Bitty Valentine Bread Tag Box
Hi Everyone,
Oh my, I am still obsessed with the bread tag shape. I just had to make one more little treat box for Valentine's Day 2014. I think I will make these for my February Board meeting. They will hold two Dove hearts just perfectly. Here is a picture of the file:
For those of you who like a pdf file you can download it from this link here:
http://www.mediafire.com/view/x0xec1lcc2u7ccs/Itty%20Bitty%20Bread%20Tag%20Box%202014.pdf
and for all the MTC peeps, use this link for the file (I also posted it on the forum)
http://www.mediafire.com/download/7iu0uqqyt2qgghn/Itty%20Bitty%20Bread%20Tag%20Box%202014.mtc
I hope you like this little cutie, I even made a double sided version and will try to post the file at some point. I made the heart paper in CA2 using Stampin Up digis. I even created the box in CA2. (It really has become my go to software) I used MTC and my ZING to cut the box.
Wishing you all a happy, crafty weekend. And if you are watching the Superbowl tomorrow I hope your favorite team wins. Thanks for stopping by,
Lysa
Oh my, I am still obsessed with the bread tag shape. I just had to make one more little treat box for Valentine's Day 2014. I think I will make these for my February Board meeting. They will hold two Dove hearts just perfectly. Here is a picture of the file:
For those of you who like a pdf file you can download it from this link here:
http://www.mediafire.com/view/x0xec1lcc2u7ccs/Itty%20Bitty%20Bread%20Tag%20Box%202014.pdf
and for all the MTC peeps, use this link for the file (I also posted it on the forum)
http://www.mediafire.com/download/7iu0uqqyt2qgghn/Itty%20Bitty%20Bread%20Tag%20Box%202014.mtc
I hope you like this little cutie, I even made a double sided version and will try to post the file at some point. I made the heart paper in CA2 using Stampin Up digis. I even created the box in CA2. (It really has become my go to software) I used MTC and my ZING to cut the box.
Wishing you all a happy, crafty weekend. And if you are watching the Superbowl tomorrow I hope your favorite team wins. Thanks for stopping by,
Lysa
Saturday, January 25, 2014
Snow Day Fun
Hi Everyone,
Thanks to Mother Nature we had a snow day this week. What a fun day Rory and I had crafting some goodies for Valentine's Day. Now I usually don't put out a lot of decorations for Valentine's or St. Pat's as we do up Halloween and Christmas so big in this house. I am always looking for a bit of a break before Easter. Rory has been asking to make a banner, and I thought this was a great opportunity to make one. Mostly because I was thinking if I said no, Rory might suggest we bundle up and go outside to build a snowman. Not that I have anything against snowmen but it was about 7 degrees outside! I decided that the banner would be all Rory's ideas. I let her pick all the paper and shapes. She even picked the words and did all the assemble too. Banners are so quick and easy with a digital cutter. We used my ZING and MTC to cut all the pieces. Rory used the Xyron for all the adhesive. She loves the Xyron! Here is a picture of Rory hard at work:
Here is a picture of the banner once it was completed:
What a great job Rory did. I keep saying "Rory, your banner is awesome"! and she keeps correcting me saying "OUR banner is awesome" We had so much fun and just wanted to keep going so we made a few extra paper hearts for the metal Hallmark tree. Here is a picture of that:
I love when Rory comes to play in my craftroom. I really can see it is just more than quality time with each other. She is really learning things. As we were making the banner we discussed color and used math skills for measuring. We used computer software to created the digital file. Rory did all the assembly and took time to center the layers. I let Rory have complete control decorating the mantle so we talked about a center focal point and height balance. We made that huge red bow out of paper twist (an old time favorite of mine) so she got to untwist the skinny paper rope into wide ribbon and use my old wood bow maker to tie the loops into a bow. We even took leftover red candy canes and melted them into hearts (235 degree oven for 5 minutes, on parchment paper). The living room looks very festive and we both agreed it was a job well done. I hear more snow is on the way next week so maybe, just maybe we will be able to spend more time together getting our CRAFT ON!
Thanks for visiting and have a crafty weekend,
Lysa
Thanks to Mother Nature we had a snow day this week. What a fun day Rory and I had crafting some goodies for Valentine's Day. Now I usually don't put out a lot of decorations for Valentine's or St. Pat's as we do up Halloween and Christmas so big in this house. I am always looking for a bit of a break before Easter. Rory has been asking to make a banner, and I thought this was a great opportunity to make one. Mostly because I was thinking if I said no, Rory might suggest we bundle up and go outside to build a snowman. Not that I have anything against snowmen but it was about 7 degrees outside! I decided that the banner would be all Rory's ideas. I let her pick all the paper and shapes. She even picked the words and did all the assemble too. Banners are so quick and easy with a digital cutter. We used my ZING and MTC to cut all the pieces. Rory used the Xyron for all the adhesive. She loves the Xyron! Here is a picture of Rory hard at work:
Here is a picture of the banner once it was completed:
What a great job Rory did. I keep saying "Rory, your banner is awesome"! and she keeps correcting me saying "OUR banner is awesome" We had so much fun and just wanted to keep going so we made a few extra paper hearts for the metal Hallmark tree. Here is a picture of that:
I love when Rory comes to play in my craftroom. I really can see it is just more than quality time with each other. She is really learning things. As we were making the banner we discussed color and used math skills for measuring. We used computer software to created the digital file. Rory did all the assembly and took time to center the layers. I let Rory have complete control decorating the mantle so we talked about a center focal point and height balance. We made that huge red bow out of paper twist (an old time favorite of mine) so she got to untwist the skinny paper rope into wide ribbon and use my old wood bow maker to tie the loops into a bow. We even took leftover red candy canes and melted them into hearts (235 degree oven for 5 minutes, on parchment paper). The living room looks very festive and we both agreed it was a job well done. I hear more snow is on the way next week so maybe, just maybe we will be able to spend more time together getting our CRAFT ON!
Thanks for visiting and have a crafty weekend,
Lysa
Tuesday, January 21, 2014
Valentine's Day Bread Tag Box
Hi Everyone,
I am so happy to be back posting and I have a cute little box to share for this Valentine's Day. I went back and forth with what kind of candy to use. I almost feel weird using nuggets instead of hearts, but at work chocolate hearts are already all over the place. So in my attempt to be different I went the route of my favorite Hershey Nugget! I need to make so many of these and I started out with a 4 piece box. Once I did the math on the price I reduced it to a 2 piece box. Not that I am a cheapo, but I will most likely be making about 40 of these and to me a 2 piece box just seemed to be a bit more romantic. So with that said here is a picture of the file:
Here is another picture of the favors:
Such a cutie! I bet a couple of bite size kit kats or some kisses would be perfect in there as well. I designed this file in CAP2 and did all my cutting with my ZING using MTC. I just love using CAP2 to design. It really is an amazing and broad software. Remember there is a free download available at the daisytrail website if you want to check it out.
Here is a link to the PDF file on mediafire:
http://www.mediafire.com/view/koeui6s80hzgq8e/Breadtag%20Valentine%20Nugget%20Holder%20with%20Notes.pdf
For my MTC friends the file is here:
http://www.mediafire.com/download/1q9y46w92wxx9aw/Breadtag%20Valentine%20Nugget%20Holder%202014.mtc
I hope you all like this little Nugget holder and leave me a comment if you do. I hope to get back to posting on a more frequent basis but as you all know life has a way of changing our plans.
Thanks for visiting
Lysa
I am so happy to be back posting and I have a cute little box to share for this Valentine's Day. I went back and forth with what kind of candy to use. I almost feel weird using nuggets instead of hearts, but at work chocolate hearts are already all over the place. So in my attempt to be different I went the route of my favorite Hershey Nugget! I need to make so many of these and I started out with a 4 piece box. Once I did the math on the price I reduced it to a 2 piece box. Not that I am a cheapo, but I will most likely be making about 40 of these and to me a 2 piece box just seemed to be a bit more romantic. So with that said here is a picture of the file:
Here is another picture of the favors:
Such a cutie! I bet a couple of bite size kit kats or some kisses would be perfect in there as well. I designed this file in CAP2 and did all my cutting with my ZING using MTC. I just love using CAP2 to design. It really is an amazing and broad software. Remember there is a free download available at the daisytrail website if you want to check it out.
Here is a link to the PDF file on mediafire:
http://www.mediafire.com/view/koeui6s80hzgq8e/Breadtag%20Valentine%20Nugget%20Holder%20with%20Notes.pdf
For my MTC friends the file is here:
http://www.mediafire.com/download/1q9y46w92wxx9aw/Breadtag%20Valentine%20Nugget%20Holder%202014.mtc
I hope you all like this little Nugget holder and leave me a comment if you do. I hope to get back to posting on a more frequent basis but as you all know life has a way of changing our plans.
Thanks for visiting
Lysa
Saturday, August 31, 2013
Halloween 2013
Hi Everyone,
I was determined to get a Halloween post up before August ended. In the past by the end of August I usually have 3 Halloween projects done and am ready to reproduce them on a large scale. This summer I was so caught up in putting the house back together after the construction that my crafty good time was much less. Then I got caught up in the whole rubber band thing and I am still in love with the loom! Well at least I have been making some black and orange bracelets. I have always loved the bread tag shape that was taken from those little plastic tabs that hold the bread bag closed. For crafting it has been around for a long time and Stampin' Up has re-sparked the trend with a thinlit die in this years catalog. Of course all the SU peeps are making a box out of it. I really wanted to make a version that has a narrow base and was cut in one piece. And as always MTC made quick work of that. Here is my picture of the box I made. It holds a fun size M&M pack really nicely.
Here is a picture of the .PDF file:
You can download the .PDF file here:
http://www.mediafire.com/view/1keyvf8gnd8j4l6/bread_tag_box_with_notes.pdf
The .MTC file is here:
http://www.mediafire.com/download/a1d088609chhunm/bread_tag_box.mtc
I hope you like this file and if you do please leave a comment and if you have any questions on this easy peasy box please don't hesitate to ask. Don't forget to check out my other free files by clicking the free file link on the sidebar.
Thanks so much for visiting and enjoy this unofficial last weekend of summer ):
Lysa
I was determined to get a Halloween post up before August ended. In the past by the end of August I usually have 3 Halloween projects done and am ready to reproduce them on a large scale. This summer I was so caught up in putting the house back together after the construction that my crafty good time was much less. Then I got caught up in the whole rubber band thing and I am still in love with the loom! Well at least I have been making some black and orange bracelets. I have always loved the bread tag shape that was taken from those little plastic tabs that hold the bread bag closed. For crafting it has been around for a long time and Stampin' Up has re-sparked the trend with a thinlit die in this years catalog. Of course all the SU peeps are making a box out of it. I really wanted to make a version that has a narrow base and was cut in one piece. And as always MTC made quick work of that. Here is my picture of the box I made. It holds a fun size M&M pack really nicely.
Here is a picture of the .PDF file:
You can download the .PDF file here:
http://www.mediafire.com/view/1keyvf8gnd8j4l6/bread_tag_box_with_notes.pdf
The .MTC file is here:
http://www.mediafire.com/download/a1d088609chhunm/bread_tag_box.mtc
I hope you like this file and if you do please leave a comment and if you have any questions on this easy peasy box please don't hesitate to ask. Don't forget to check out my other free files by clicking the free file link on the sidebar.
Thanks so much for visiting and enjoy this unofficial last weekend of summer ):
Lysa
Sunday, May 26, 2013
Room 2 Is Almost There!!
Hello,
Is there anybody in there?
Just nod if you can hear me. Is there anyone home? Oh wait that is just a flash back to my youth! OK, OK, I just needed to express that. Indulge me if you will as I am a bit off since we started this whole room redo business. Can you believe I looked the "Hubs" in the eye and said ...
(and I quote) "I am nothing without my craft supplies" Oh yes, sad, I know .... but I really said that. And what is really sad was at the time I am pretty sure I meant it. To be honest I think I said it while I was in the garage, crawling over the snow blower to get to my sewing machine. It may have been when I was in the basement where I put all the "VIP" craft supplies and was digging out my ZING and my rolls of vinyl. I'm not sure when I said it but I did say it. So what seems to be happening is that all my carefully packed up craft supplies are now needed for decorating Rory's room. So I am digging for everything and just making a mess of the boxes and the order of things. The living room and dining room are starting to look like a craft room. The little one's bedroom is all painted and just waiting for furniture and decorations. Rory requested a Broadway musical theme, which at first I thought would be fun and easy. True to form I have gone full blown nuts and I am now out of control. So I go online and look for bedding that has a musical theme. That did not go so well. I guess music notes are not "trending" right now. While I did see a few nice sets, none were available locally. By locally I mean in the United States. Sure there are some in China and Canada, but the shipping or the bulk buying made them unavailable to me. Well then, let's just make it. Here is a picture (minus the headboard, which is coming this week):
How cute is her blanket?! I think the first thing I learned to make in Brownies was to tie fabric together. With today's Polar Fleece it was a snap. Music notes on one side and solid black on the other side, it came out great.
Next up was her window treatment. I could not find curtains with music notes after searching for 2 days. Hobby Lobby bailed me out with some sheet music fabric that I made quick strips out of. I bought an extra set of black sheets so that I could make the strips one side sheet music and the other solid black. Here are pictures of the windows:
How simple is that! And left over cotton sheeting to add a strip to the ready made sheet set, and a pillow too! Here is the pic:
What's that above the window you ask? That's the awesome vinyl Broadway border we are creating (as we go, I might add) Here are some pics of our Playbill inspired vinyl wall art.
And that music staff! Wow, thanks to MTC and my ZING that is the actual notes to the song Look Down from Les Miserables. Here is a picture of that action:
You know what my favorite part of this picture is? Why it's the fact that the same tablecloth is in my diaper cake video from 2007. See, I take care of my things! Please check back to see the finished border and room. The furniture arrives this week and we did recycle some things from Rory's old room. I can see how excited she is each time she peers in to see how things are going. I feel blessed and lucky that I am able (along with the Hubs and our daughter Sam) to provide this room and space for my awesome Grand-daughter. Did I mention she is singing a solo of "castle on a cloud" in her spring concert? My joke of the day is that I think we should make Room #3 a guest room because my craft supplies look right at home in the dinning room (after all, that's where they started out!) Enjoy what's left of the holiday weekend and check back soon to see the finished room.Lysa
(and I quote) "I am nothing without my craft supplies" Oh yes, sad, I know .... but I really said that. And what is really sad was at the time I am pretty sure I meant it. To be honest I think I said it while I was in the garage, crawling over the snow blower to get to my sewing machine. It may have been when I was in the basement where I put all the "VIP" craft supplies and was digging out my ZING and my rolls of vinyl. I'm not sure when I said it but I did say it. So what seems to be happening is that all my carefully packed up craft supplies are now needed for decorating Rory's room. So I am digging for everything and just making a mess of the boxes and the order of things. The living room and dining room are starting to look like a craft room. The little one's bedroom is all painted and just waiting for furniture and decorations. Rory requested a Broadway musical theme, which at first I thought would be fun and easy. True to form I have gone full blown nuts and I am now out of control. So I go online and look for bedding that has a musical theme. That did not go so well. I guess music notes are not "trending" right now. While I did see a few nice sets, none were available locally. By locally I mean in the United States. Sure there are some in China and Canada, but the shipping or the bulk buying made them unavailable to me. Well then, let's just make it. Here is a picture (minus the headboard, which is coming this week):
How cute is her blanket?! I think the first thing I learned to make in Brownies was to tie fabric together. With today's Polar Fleece it was a snap. Music notes on one side and solid black on the other side, it came out great.
Next up was her window treatment. I could not find curtains with music notes after searching for 2 days. Hobby Lobby bailed me out with some sheet music fabric that I made quick strips out of. I bought an extra set of black sheets so that I could make the strips one side sheet music and the other solid black. Here are pictures of the windows:
How simple is that! And left over cotton sheeting to add a strip to the ready made sheet set, and a pillow too! Here is the pic:
What's that above the window you ask? That's the awesome vinyl Broadway border we are creating (as we go, I might add) Here are some pics of our Playbill inspired vinyl wall art.
And that music staff! Wow, thanks to MTC and my ZING that is the actual notes to the song Look Down from Les Miserables. Here is a picture of that action:
You know what my favorite part of this picture is? Why it's the fact that the same tablecloth is in my diaper cake video from 2007. See, I take care of my things! Please check back to see the finished border and room. The furniture arrives this week and we did recycle some things from Rory's old room. I can see how excited she is each time she peers in to see how things are going. I feel blessed and lucky that I am able (along with the Hubs and our daughter Sam) to provide this room and space for my awesome Grand-daughter. Did I mention she is singing a solo of "castle on a cloud" in her spring concert? My joke of the day is that I think we should make Room #3 a guest room because my craft supplies look right at home in the dinning room (after all, that's where they started out!) Enjoy what's left of the holiday weekend and check back soon to see the finished room.Lysa
Sunday, February 17, 2013
Saint Patrick Day Is Coming!
Hi Everyone,
With Valentine's Day behind us and a very cold 3 day weekend, I took a moment to take down my little ode to Saint Valentine and bring in Saint Patrick. It was easy because I only do a small display on one side of the living room. While I was doing that, Rory was busy putting up Easter everywhere else! I must say it is nice to see some signs of spring. With that said I had time today to get going with a bit of St. Pat's magic and created my little favor for the work peeps and anyone who stops by here at the house on parade day. (parade day is very big here where we live) It really is one of my most favorite days of the year. We can only leave the house on foot as we are blocked in due to the parade. In my "younger" days I was out there right on the parade route cheering and acting up . . . now I just hunker down and make the corned beef, cabbage and fixen's for a great dinner at the end of the day. I thought I would share this little file with you all. I just love how cute they look hanging on my Hallmark tree. You could mount the Pot O' Gold to the front of a card. As you can see I used my favorite tag that is a stamp from SU. I really need to make a new graphic as I use it all the time. Here is a picture of the file so that you can see how easy peasy it is to make.
How simple does that look! I plan on making about 30 or so. I used my ZING and MTC to cut this file and as always it was a dream. For those who want the PDF file you can find it here:
http://www.mediafire.com/view/?zcifyz5wactqdy5
and MTC fans the file is here:
http://www.mediafire.com/download.php?4uf974504946kxm
Here is a close up of this cute little holder:
I hope you give this little cutie a try, it is quick and easy also keep Halloween in mind because I am so seeing a witches cauldron too!
Have a great night and thanks for stopping by,
Lysa
With Valentine's Day behind us and a very cold 3 day weekend, I took a moment to take down my little ode to Saint Valentine and bring in Saint Patrick. It was easy because I only do a small display on one side of the living room. While I was doing that, Rory was busy putting up Easter everywhere else! I must say it is nice to see some signs of spring. With that said I had time today to get going with a bit of St. Pat's magic and created my little favor for the work peeps and anyone who stops by here at the house on parade day. (parade day is very big here where we live) It really is one of my most favorite days of the year. We can only leave the house on foot as we are blocked in due to the parade. In my "younger" days I was out there right on the parade route cheering and acting up . . . now I just hunker down and make the corned beef, cabbage and fixen's for a great dinner at the end of the day. I thought I would share this little file with you all. I just love how cute they look hanging on my Hallmark tree. You could mount the Pot O' Gold to the front of a card. As you can see I used my favorite tag that is a stamp from SU. I really need to make a new graphic as I use it all the time. Here is a picture of the file so that you can see how easy peasy it is to make.
How simple does that look! I plan on making about 30 or so. I used my ZING and MTC to cut this file and as always it was a dream. For those who want the PDF file you can find it here:
http://www.mediafire.com/view/?zcifyz5wactqdy5
and MTC fans the file is here:
http://www.mediafire.com/download.php?4uf974504946kxm
Here is a close up of this cute little holder:
I hope you give this little cutie a try, it is quick and easy also keep Halloween in mind because I am so seeing a witches cauldron too!
Have a great night and thanks for stopping by,
Lysa
Labels:
Free file,
MTC,
Papercrafts,
St. Patrick's Day,
Stampin' Up,
ZING
Friday, February 1, 2013
Valentine File Share
Hi Everyone,
As promised, here are my Valentines that I am making for my work peeps. I just can't wait to give them out! This file was made for a little card insert (which I included in the file share) I am filling them with small AVON lip glosses that are just adorable and I know the girls will love them. I have some guys on my list as well and don't you know they hold a Ghirardelli chocolate perfectly. Yeah, a multipurpose Valentine. Here is a picture of a completed one:
http://www.mediafire.com/view/?f6bbw5u9dom0kit
The MTC file is here:
http://www.mediafire.com/download.php?aya7990f28k616f
I hope you all like this file as much as I do. I think I would like to change out the heart for other shapes like a butterfly (for this years cancer walk) or maybe even a bunny. Let me know if you have any questions or problems. Have a great weekend and thanks for stopping by.
Lysa
As promised, here are my Valentines that I am making for my work peeps. I just can't wait to give them out! This file was made for a little card insert (which I included in the file share) I am filling them with small AVON lip glosses that are just adorable and I know the girls will love them. I have some guys on my list as well and don't you know they hold a Ghirardelli chocolate perfectly. Yeah, a multipurpose Valentine. Here is a picture of a completed one:
I had so much fun with these. You can leave them plain or add a strip of paper to decorate them. If you need to make them really quick just use a Valentine themed pattern paper. However you make them I know they will come out adorable. Here is a picture of the file:
I have included the score lines but I scored by hand. There are only 3 score lines, the 2 side lines are easy to see and the middle line is just 4 inches from the top. Simply fold the bottom to the top, fold the hearts in to the center and use the slits in the hearts to lock in place. I just love this little cutie! For those of you who want to grab the .pdf you can find the file here:
http://www.mediafire.com/view/?f6bbw5u9dom0kit
The MTC file is here:
http://www.mediafire.com/download.php?aya7990f28k616f
I hope you all like this file as much as I do. I think I would like to change out the heart for other shapes like a butterfly (for this years cancer walk) or maybe even a bunny. Let me know if you have any questions or problems. Have a great weekend and thanks for stopping by.
Lysa
Tuesday, January 29, 2013
Valentine's For Work Peeps 2013
Hi Everyone,
Here I go again with a rambling blog post. I am so in L-O-V-E with my 2013 Valentine's that I my brain is moving faster than my typing fingers. This was just one of those projects that just makes me shout the phrase "Awesome Crafty Goodness!" This was one of those projects where I bought little and produce something I really liked. That picture above . . . was a date stamp that was in the garbage at work. I knew I had to rescue it. It was just waiting for me to cut it apart for some reason. All I did was run a bit of adhesive across the block and there you have it, my little Valentine tag. Those little tags were cut with MTC and my ZING. I used MTC to modify my Stampin 'Up word window and modern label punch and reduced them to those little cuties. There you have it the first two parts of these little Valentines that I am love'n. But wait, there is more, here is a picture of the graphic I used for the body of the Valentine:
Why am I so excited you ask. Well, I bought that digi download of Echo Park's "Yours Truly" last year from Jessica Sprauge and I just loved the papers from the start. I used my CraftArtist 2 to split and flip the graphic at the right point so that the word LOVE is right side up on both the front and back of the Valentine. Other than me who would notice but hey it makes me happy. Gee, I just can't say enough how much I love my CA2! See the black outlines. They are there because on my Fiskars cutter the blade is exactly 1/4 inch away from the index line on the right side. That is how they get cut so quickly and perfectly to fit. Between CA2 and Fiskars, template making is easy peasy good! But wait, there's more! Xyron!! I love Xyron . . . check out this picture:
That's a lot of stickers! when you need an edge to edge adhesive Xyron is the go to machine. I bought my 850 in the late 1990's and I still use it today. It is one of my tried and true tools. I forgot to mention I used my We R Memory Keepers corner chomper to round those corners. Need I mention that I just ordered their envelope board from Scrapbook.com. I can't wait to get it. Now you might think the next picture would be the finished product but no. I have to show the parts of the whole because that is my favorite thing. I love when all the parts are prepared and waiting to become the whole. Here is the picture:
OMG! Just look at all that crafty goodness! See the little AVON lip gloss, how cute are they? and the XO tags that I printed on some old 3 column journal paper, love them!. Those odd looking bases were designed in my KnK studio software and cut with MTC. My Valentine's came out great and if you come back and visit on Friday, I will be posting the end result and the file share. I don't mean to be a tease, it's just that I want to finish a few more and get a pic. Thanks for visiting and check back because I think you are going to love this file as much as I do.
Lysa
Here I go again with a rambling blog post. I am so in L-O-V-E with my 2013 Valentine's that I my brain is moving faster than my typing fingers. This was just one of those projects that just makes me shout the phrase "Awesome Crafty Goodness!" This was one of those projects where I bought little and produce something I really liked. That picture above . . . was a date stamp that was in the garbage at work. I knew I had to rescue it. It was just waiting for me to cut it apart for some reason. All I did was run a bit of adhesive across the block and there you have it, my little Valentine tag. Those little tags were cut with MTC and my ZING. I used MTC to modify my Stampin 'Up word window and modern label punch and reduced them to those little cuties. There you have it the first two parts of these little Valentines that I am love'n. But wait, there is more, here is a picture of the graphic I used for the body of the Valentine:
Why am I so excited you ask. Well, I bought that digi download of Echo Park's "Yours Truly" last year from Jessica Sprauge and I just loved the papers from the start. I used my CraftArtist 2 to split and flip the graphic at the right point so that the word LOVE is right side up on both the front and back of the Valentine. Other than me who would notice but hey it makes me happy. Gee, I just can't say enough how much I love my CA2! See the black outlines. They are there because on my Fiskars cutter the blade is exactly 1/4 inch away from the index line on the right side. That is how they get cut so quickly and perfectly to fit. Between CA2 and Fiskars, template making is easy peasy good! But wait, there's more! Xyron!! I love Xyron . . . check out this picture:
That's a lot of stickers! when you need an edge to edge adhesive Xyron is the go to machine. I bought my 850 in the late 1990's and I still use it today. It is one of my tried and true tools. I forgot to mention I used my We R Memory Keepers corner chomper to round those corners. Need I mention that I just ordered their envelope board from Scrapbook.com. I can't wait to get it. Now you might think the next picture would be the finished product but no. I have to show the parts of the whole because that is my favorite thing. I love when all the parts are prepared and waiting to become the whole. Here is the picture:
OMG! Just look at all that crafty goodness! See the little AVON lip gloss, how cute are they? and the XO tags that I printed on some old 3 column journal paper, love them!. Those odd looking bases were designed in my KnK studio software and cut with MTC. My Valentine's came out great and if you come back and visit on Friday, I will be posting the end result and the file share. I don't mean to be a tease, it's just that I want to finish a few more and get a pic. Thanks for visiting and check back because I think you are going to love this file as much as I do.
Lysa
Labels:
CA2,
MTC,
Papercrafts,
SHOUT OUTS cause I love'em,
Stampin' Up,
Tags,
Valentine's,
Xyron,
ZING
Subscribe to:
Posts (Atom)


