Showing posts with label Weddings. Show all posts

Thursday, March 9, 2017

A Picture Really Is Worth A Thousand words (And Dollars Too!)

Hi Everyone,
Not sure if anyone is still with me as my health issues keep me at a minimum crafting level.  I try and try to keep crafts in my life and do manage to get into the craftspace here and there.  I must say the space is a mess and I say everyday I am getting in there to clean up and organize.  Well, that just never happens!  My general health is not great and the month of February was not kind to me. I ended up in the hospital twice. The first time for four days and the second time for six days.  Amazing how the Doctors and Nurses can bring you back to life. Okay enough of the cancer drag and onto the thousand dollars.  A friend at work son is getting married. Yeah, I so love a happy occasion. My friend  Cindy asked if I ever made a money cake as she wanted to give them one at the bridal shower.  I told her "No, only diaper cakes".  After a bit of research I thought the money cake looked like an easy and fun project.  I must say I was a tad nervous when I fell ill as I had $1,000.00 of Cindy's money in my house.  It all worked out as I worked on it a little at a time over the course of 2 weeks or so.  I think I spent about 3 hours total time on the assembly of the cake and the project got me out of my sick bed and into the craftspace (A huge thanks to Cindy).  So let me start by saying I had to put my own spin on the cake.  I started with figuring out the money.  I use my CraftArtist2 software to create the 3 tiers of the cakebase (which are 10", 8", and 6") I then created 3/4 inch circles to go around the base circle placing them in a format of bills that added up to $1,000.00 dollars.  This template was great as my friend could clearly see the bills she needed to get from the bank.  My research showed that most people roll the bill and secure them with small rubber bands. Not me as usual because I wanted all the rolled bills to be the same size.  I had an idea to create 3/4"X1/2" tubes out of the candy bags I use for Hershey nugget crafts and it worked like a charm.  I simply used my wood burning tool to divide and seal the bag and then cut that strip into 1/2 " lengths with a pair of scissors.  Worked great and all the rolls were the same size. If you look close in this picture you can see them centered on the bill.
The best part is when the cake is given to the Bride, all she has to do is pull up on the roll to get the money.  No need to disassemble anything.  Following the template I used glue dots placed on the plastic sleeves to create the strip of bills and then glue dots to attach the strips to the base.  No glue dots touch the money only the plastic sleeve.  I left open spaces for decorative elements.  This worked out perfect to keep the bills centered and organized. Again the template was worth taking the time to make.  Here is a picture of one of the die cuts used to fill the spaces:
Here is a close up of the topper:
Lots of ribbon on the cake make it pretty:
And here is the finished cake ready to go:
I really did enjoy this project. I used my CraftArtist2 software along with my Brother Scan N Cut to make the die cuts.  I want to thank my friend Cindy for inspiring me to get up and get moving.  I also want Cindy to know that I always feel just a bit a part of the wedding and the family when something I made appears at the shower or the wedding.  I am truly blessed to have peeps that still think of me as more than a person who is ill and do their best to help me to keep on keeping on. Much love and blessings to the happy couple for a wonderful wedding and long life together.  Thanks for stopping by,
Lysa

Friday, November 25, 2016

Crafts For My Daughter's Wedding

Hi Everyone,
It sure has been a long time since my last post. As many of you know I have been sick and trying my best to live my life while fighting pancreatic cancer. While it has been a huge challenge I am happy to say I am still here living and breathing.  One thing that help me through to this point was my daughter Sam's wedding.  While I was home on sick leave I did my best to craft as much as I could for the wedding. My intention was to post pictures along the way but it was all I could to to get each project done between my chemo treatments.  I did take cell phone pictures along the way and I thought I would share them with you now that things have settled down.  I will tell you that almost all of the projects were done using CraftArtist2 software.(my favorite)  I used my ZING and Brother Scan n Cut for most the die cutting. The other die cuts like the butterflies were made via my sizzix and the Stampin' Up butterfly die.  All the projects were so huge that I left my craft room for the dining room table.  The house was a hot holly mess for about six months!  All of the paper was ordered from LCI paper in Massachusetts and is Stardream paper in quartz, black and silver.  I got great feedback on the quality and level of all the projects.  So along with a few comments here are the pictures:
POCKET INVITES:
I purchased pre-made pockets as the cost was cheaper than if I cut them myself.
I foiled this die cut with my old Provo Your Story laminator.
The printing was all done with a canon laser printer. The corners were done with the SU triple corner punch.  My hand hurt after all the punching!
This quote is from the song they used for their first dance.
SHOWER INVITES:
I only took one pic, but the peeps loved them! Wish I had a better picture.
SHOWER FAVORS:
I bought them online and the packaging was awful so I needed to change it up.
They looked so much better!
THE BANNER:
I made a nice banner for the gift table at the shower.
Wish I had a better picture.  The letters are connected with SU butterflies.
THE REHEARSAL DINNER:
These were made with the SU floral bouquet die.


FAVORS FOR THE REHEARSAL DINNER:

Hershey Nuggets, one of my favs! Sure wish I had better pics!!
BUBBLES FOR THE CHURCH:
I made 65 of them and they are all gone. I should have kept one at the house as a keepsake.
CHURCH PROGRAM:
I had so much fun with these!
THE JENGA BLOCKS:
In lieu of a guest book the bride chose Jenga blocks to be on each table.  The guests wrote a lot of funny things.  This makes for a great keepsake!
The carrier is double sided so there were 12 blocks per table with two pens.  This went over BIG!
BUTTERFLIES: (like crazy)
Butterflies everywhere including the centerpieces.  I made them for the florist and then she attached two per centerpiece.
The florist loved them! I don't have a picture of the centerpieces yet.  I will add it once I get the pics from the photographer.
Oh my are you still with me.
 THE SEATING CANDLES:
These were changed up from the original design but still I got the look I was going for.  It brought a lot of candle light to the tables when the guests picked them up from the piano and brought them to the tables in the ballroom.


 WEDDING FAVORS FOR THE KIDS:
Because there was wine in the wedding favor, we made up these drink cups filled with candy for all of the kids.
AND FOR THE ADULTS:
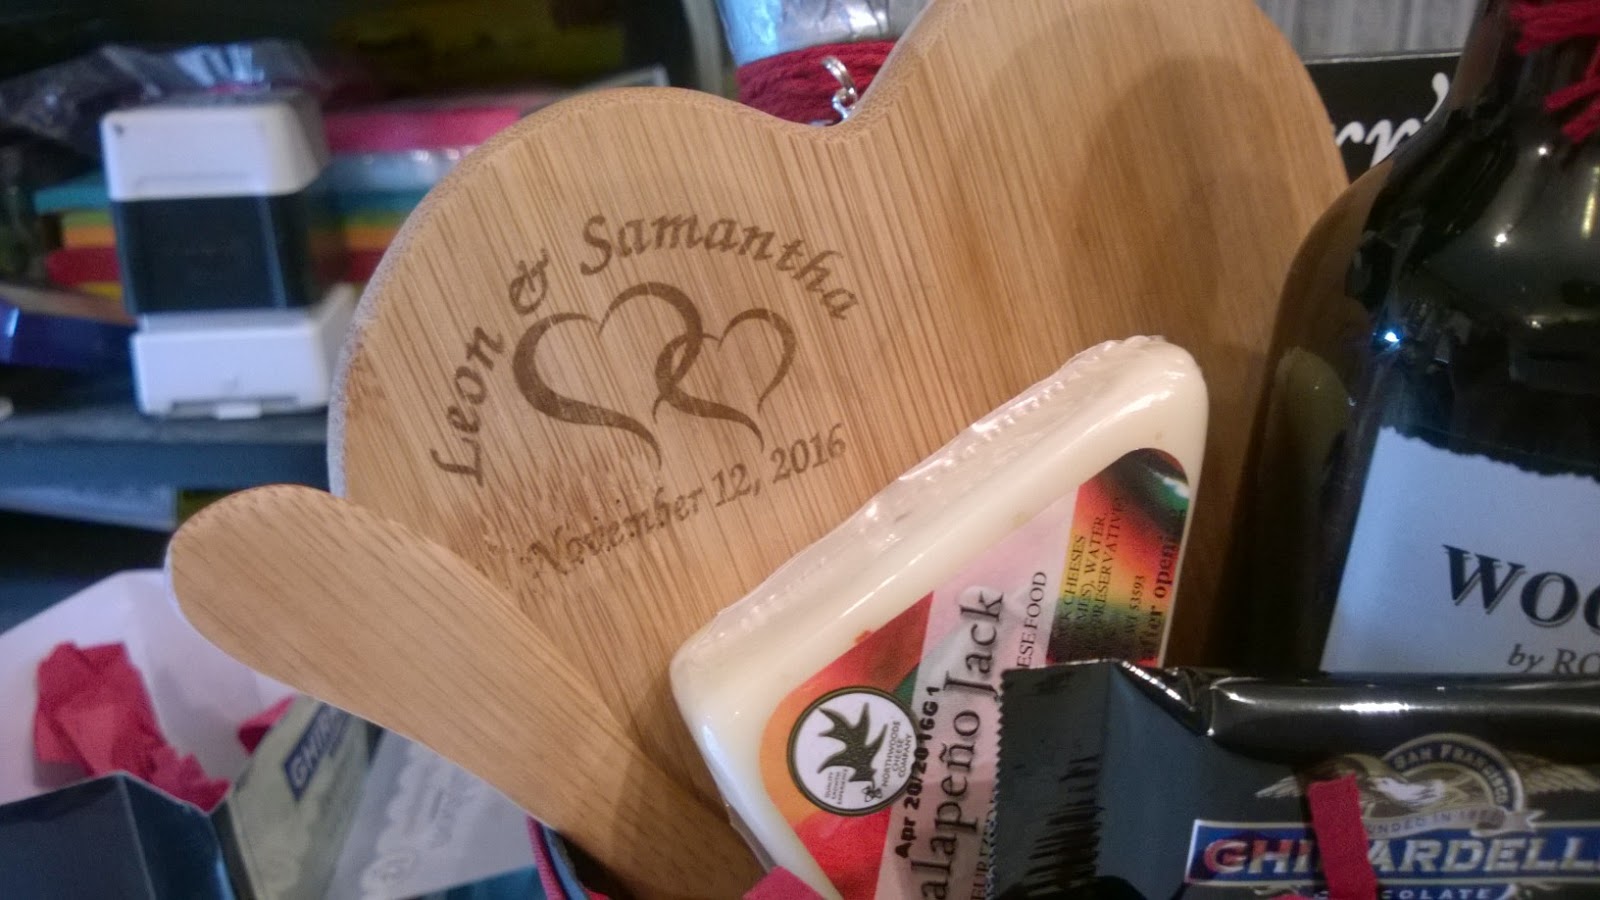
A wine a cheese basket complete with cutting board.
Here is a better shot of the cutting board.
We made 75 baskets, here they are wrapped and ready to go.
 It was a bit of a pain getting them to the venue.  We bought boxes from home depot and got 12 into each box.  It was a lot.  I made a few other things as well and these items are just a few of them.  So now that the wedding is behind me it is time to start to focus on a Christmas craft.  I am not sure how it will go as I have returned to work full time and I will have to go back on a full chemo schedule.  Hopefully I will get my Christmas craft mojo going and I will have somethings to post.  Wish me luck and thanks for visiting.
Lysa


Saturday, July 11, 2015

Berry Basket for the Wedding

Hi Friends,
I can't begin to tell you all how far along with wedding crafts I am. I feel like I am really getting organized and ready to do the large scale supply buy. I have made a lot of samples for Sam to look at and one by one final choices are being made.  We wanted to make a wine and cheese basket as a favor or take home snack for after the reception. I was all over this one from the onset. My work peeps we too, telling me it was cost exorbitant. I laughed and said you're joking, I could bring this baby in for $8 each. Yeah well the joke is on me, because 1 mini wine bottle turned in to 2. 1 piece of cheese turned in to a piece of cheese and a mini summer sausage. The hershey nuggets became Ghiradelli. We had to add a charm to each wine bottle.  The saltine crackers became Carr's crackers. The basket filler went from shreds from the dollar store to custom shredded Stampin Up Cherry Cobbler cardstock. I could go on and on. I don't even want to mention that the berry basket paper went from SU black cardstock to this awesome shimmer paper that is imported from Italy and purchased from LCI paper. That happened when we decided the basket paper needed to match the invitation paper. Sure . . .  sure you want me to tell you how it all priced out in the end. Well all I have to say is . . . Can we really put a price on the smile on my and my daughters face? I do so hope you are laughing along with me and not shaking your head at how crafty crazy I am. I can't even tell you the full price out because I still have not packaged it under cello or made the outter tag.  Plus you know I have to add some ribbon to the outside too.  Oh well this is me, always was and always will be! So I have the berry basket file for you today.  First off here is a picture of the file:
If you would like this file the PDF is here:
http://www.mediafire.com/view/lxfb54fbnd7j5vf/berry_basket_for_upload_with_notes.pdf
If you prefer the MTC file you will find it here it does not have score lines on the top strip:
http://www.mediafire.com/download/akbhww7ejgr40e8/berry_basket_mtc_for_upload.mtc
I also want to show you a picture of the cheese board with the kids name and wedding date added here is that picture:
The pictures of things you see along the way are all from the samples I have been making. All of the ribbon has now been changed out from Stampin Up Cherry Cobbler to Offray Sherry in satin.  The Stampin Up linen and seam binding ribbon was just freying to easily.  I could seal the edge of the linen but not the seam binding. Plus the shine of the satin is much nicer.  The tealight place card holders look so much better with the ribbon change out.
I will be making the final samples of everything from the invites to the basket in the course of the next few weeks so that I can get my supply lists ready. Wish me luck, the craftroom will surly be hopping!  Thanks for stopping by,
Lysa
Sunday, July 5, 2015

Back, But Never Really Left

Hi Crafty Friends,
WOW, how long between posts? Too long!! First a quick catch up . . . spring cleaning, end of school year, heavy work load and knee surgery too. No need for the details on any of that. Simply put life has caught up with me for sure!! Through it all I have been crafting and gathering ideas. Wedding ideas! How is it that when a wedding is a year and a half out, one becomes obsessed with all things wedding. So I have one daughter and while I have never been a party planner type, I have resigned myself to the fact that I want it all to be perfect.  I have looked at favor ideas on pinterest, etsy, ebay and every wedding site on the net. I have purchased paper samples, favor samples, you name it I have already researched it. I am now done! The wedding is a year and a half away and it's time to rein myself back into reality. Now with that said I am starting with the most simple reception item I can think of.  The seating cards.  You know, when you get to the venue the little card that tells you what table you are seated at.  If you dare go ahead and google the phrase "wedding placecard holder ideas".  REALLY, there is like hundreds of ideas that would run from cheap to crazy expensive.  So my job as Mom of the Bride was to find the one we could afford, I could make, and the one that would fit the moment.  Come on peeps!, have some faith, I found it. and we love it!!! The venue where the wedding receptions is to be held has an awesome black grand piano at the top the this great staircase.  That is where the venue puts the seating cards.  So the guests come up the steps and the first thing they see is this beautiful piano. After much research and some trial and error, Sam and I thought some form of candlelight on the piano would be awesome, so why not incorporate candlelight and the place card together. The venue would not allow for wax candles so we knew going in that battery operated tea lights would be our best and only option.  I saw on google images some great tea light holders using them.  I ran (yes, ran . . . operated knee and all) down to the kitchen drawer where all my votive holders are and grabbed a plain 2-1/5 inch tall glass votive holder and got to work. I used CraftArtist2 to create the vellum wrap for the holder.  I printed the label on my Canon laser printer and foiled the label with silver foil that I bought from MyBindingCo.com. (for an awesome price, I might add) and I use my laminator to foil the label. Wow!  I can just see 60 or so of these sitting on top of the piano.  I think the best part will be that everyone will bring these to the table so there will be additional  candlelight on every table during the reception.  I have pictures and I only wish it was a picture of all of them, but for that you will need to come back and visit around November of 2016!  If you have any questions on how I created the template let me know.  Here are the best pics I could get:
Thinking that the SU Cherry Cobbler seam binding ribbon will be changed out for something satin.
I promise I will add a pic of them all at some point.  In the meantime, my next quest will be the bubbles. Gotta have bubbles at the church for sure! I can't even begin to talk about the favors for the wedding and for the shower.  We surely have become "go big or go home"! So much for the budget, oh well, only one daughter so I guess I am going BIG!!
Thanks for stopping by,
Lysa

Tuesday, June 19, 2012

Kristen's Shower Favors! Done!!

Hi Everyone,
Wow, I haven't posted in weeks!  I have been busy, busy, busy! Work (busy), Household (busy), and my favorite of all CRAFTY BUSY!!  Yet, I am still behind on everything. So the shower favors for Kristen are done and that completes my contribution to this wedding.  I am honored that I was able to help a friend and be part of a young couple's wedding. I showed you all the buttons and the shower invitations, here are the favors that will be given out at the shower. First let me tell you the theme is Mickey's kitchen and cookies.  The couple both work for Disney at the Orlando resort.  They love their MOUSE. and cookies are a large part of this family.  My friend Donna is a baker extraordinaire.  Donna always has that yum, yum recipe that you need in a pinch. So this shower theme makes perfect sense if you know the family. The centerpieces are cookie jars of Mickey.  The table linen is all red, white and black.  I am sure the room will look awesome.  The favor box will hold 3 cookies that are made with the included recipe. The cookies are cut with a Mickey logo cookie cutter, one of which is tied to the top of the box.  They look fantastic! Here are some pics I took along the way.  I of course have to tell you some crafty info as well.  Here is a picture of the box blanks.  I cut them with my ZING. I made the file in my KnK studio software (still a fav of mine) and easily copied and pasted the file in to my MTC software for cutting.  Donna bought me awesome cardstock from LCI paper in Massachusetts.  It is the same paper used for the invitations. Here is the first picture:
 That is 40 boxes ready to go.  This cardstock was so thick. Cut beautifully, but scoring was a bit hard on the hand. No worry, it got done.
 Here is a picture with the added belly band.  I used my DSA2 to create the printed strip.  Just like I did with the invitations.  The key here for me is to create a bounding box that is 1/4 inch larger on the four sides. I line that line up with the 1/4 inch mark on the right side of the blade, that is the line I use to cut with my fiskars trimmer.  Makes easy work of cutting all those strips

 This picture shows the tag parts along with the clear plastic box tops.  My best tip here is if you need clear plastic for windows, boxes or box tops - go to staples and buy clear report covers.  They work great. They cut and score like butter.
I just had to throw in this picture of the tag fronts coming off of the xyron.  I mostly use tombow or sctoch glue but I ran out and wanted to finish the front of the tags. My tip here is if you are using your xyron anything make sure you give a good rub down to avoid the pesky glue balls (keep a glue eraser hand too)!
and here at last is the finished favor. I love the bakery string which I must tell you was donated by our favorite local bakery. The red tissue is food safe Wilton brand tissue. The finished box is 41/4 inch square. See the cookie cutter?  How cute are they?

Donna's friend KG will be baking up a storm to fill these boxes with her wonderful cookies just prior to the shower.  Everyone will be joining together the evening before to fill and tie the boxes.  A family celebrating a wedding is a blessing and I feel better than good that I was able to contribute.  I wish Adam and Kristen a long happy, love filled journey. I have been married for 28 years and to be honest another 28 wouldn't be enough! That is what I wish for this young couple. Love you Donna! Many blessings to your family!!!
A shout out of thanks to Donna, Kristen, Adam(for allowing me to share in your joy), KG (for your delicious cookie sample) my ZING, DS2, Tombow, Fiskars, Xyron, my HP Printer, Vodka (anyone who knows me, understands)(inside joke), my MICKEY martini glasses(a gift from Adam & Kristen) and the Hubs (for my awesome craftspace)
Thanks for stopping by,
Lysa

Saturday, May 5, 2012

The Wedding Buttons - Out For Delivery!


The buttons have been done for weeks, but as always I hit a snag! DO NOT and by that I mean DO NOT!!!!spray paint a wicker basket with enamel paint.!.! I say this not because it is bad paint, I say this because it takes about 3 weeks for the smell of the paint to dissipate. Yes, it is true. No matter how much airing out or potpourri or even dryer sheets or baking soda is involved you will need 3 weeks for the smell of the enamel paint to go away. Lesson learned, from now on it is sponged on water based acrylic paint for me! I am now able to put the basket under cello wrap for delivery. Here are the pictures of how the basket came out. I am happy to deliver this basket of goodies to my friend Donna. I hope the Bride, Groom and guests are as happy as I am about how the buttons came out.
 I enjoyed making these buttons because it was such a large scale project.  I was able to print the 200 graphics with my HP 7500a printer, cut them with my KnK ZING using the PnC registration, followed by 200 bag toppers printed with the HP and cut with the ZING. Bagged in a standard Wilton candy cello bag and then tied off with ribbon.  It really made me happy to see 200 items all made by me!
Thanks for stopping by and remember I still have Kristen's shower favors on my crafty list of things to do.
Have a great week end!
Lysa

Thursday, April 19, 2012

The Last Invitation Post . . . I Promise

Yeah! Brought the Invites to Donna today.  I think she loved 'em. Wish I could have gotten a better picture but it was late last night and I knew I was facing  a bit of a day at work.  All I can say is I did my best and I really liked how they came out but .... I do now know that I will not be going into the invitation business anytime soon.  I did enjoy making them but I didn't get the same kick I usually get when I make a "little somethin' somethin' candy favor.  This project was a bit more mechanical than artsy to me.  It was all about the templates for the card and the layout.  Which was cool but ... I guess I just missed the candy.  I have always known it is all about the candy with me.  With that said I am moving on to the favors and I do love them.  They have cookies. Ummmmmmmm COOKIES!  Can't wait to give you a peek. Thanks for stopping by,
Lysa 

Saturday, March 3, 2012

200! WOW! I Can Do It!


Yes, Here is another post about the wedding buttons for Adam & Kristen.  I am getting excited as I see them slowly coming together.  I printed, cut and pressed all 200 buttons. So the next step was to package them. I made up a sample for Donna and she like it so we decided to go with it.  Now I love it too but all good things seem to have a bit of a catch.  Little things like we ordered the paper on line.  Sure it said the color was navy.  But when the paper came I didn't like the color.  It looked washed out. So of course, (with family shouting in the background "You're Nuts") I ran the paper through my printer to get the deep navy I needed. Here is picture, You can see the difference:
Now one might think this is an expensive waste of ink, but I buy my ink online and use an after market ink system so really the expense was worth the end result. Here is a picture of the final package.  I LIKE it!

The next time you see these buttons... will be all 200 in a white basket ready for handing out.  I owe this project to my ZING because I completed 200 PnC's  for the button graphic. I cut 200 of the blue button base holders and 200 of the Donald/Daisy toppers(PnC) with my ZING.  That darn machine is amaZING! I can't wait to finish the bow work on these.  I am having a blast just knowing that I can produce 200 of anything.  Thanks for visiting and I will post a picture of the basket as soon as it is done.  Have a great weekend,
Lysa

Friday, February 17, 2012

100 Down - 100 To Go!


Hi Everyone,
And so the wedding stuff begins. Can you believe I have already made 100 buttons for Adam and Kristen!  Wow, I am moving fast thanks to my ZING.  Pressing them with my Badge a Minit has been easy peasy using the bench press and even though some think it is a tad hard on the hands I have not had a problem.  Working in groups of 25 and using the PnC feature on the ZING has made easy work of it.  So with that said - Once all 200 are made I will move onto how to package them for Donna.  I am thinking that they will be in a basket so she can hand them out to the guests as they begin their run into the park.  For those who didn't know it goes like this ... at Disney with the button on you may get a bit more personal attention from a character or theme park employee (like photo ops) as they know you are there for a celebration.  Donna had thoughts of t-shirts as well. I like the buttons and think they are a fun addition to a day in a Disney park.  When it is all said and done I think that they will look awesome packaged and in a basket for handing out.  I love that kind of favor, you know just a little something something that is there to add to the occasion. Here are my pics for this week and for sure when I figure out the packaging I will post that too.  Have a great President's weekend and get your craft on 'cause St. Pat's is just 'round the corner! Thanks for stopping by!
Lysa