Sunday, October 13, 2013

The Scan N Cut, Do I Love It?

Hi Everyone,
I am not one for reviews because I know from experience that what works for one rarely works for all.  I am not a professional artist but let's face it, I am pretty darn crafty.  No, really I have a whole room dedicated to the art of not just awesome crafty goodness but the art of draining the family checking account! And I practice both on a daily basis.  So here is what I can tell you.  I do love the Brother SnC. Yes I do, but don't be fooled by that fact because I also love my KnK xl, my KnK ZING, my 2 Wishblades, 3 Crickets (no, I will not include the Imagine in the count 'cause that is just a door stop) So with that said you can tell I just love digital die cutters and I love all the software that goes along with them.  But in this case, at this time there is no software.  Brother has a website set up for an online editing program however it is not live yet.  The name of it will be www.scanNcutcanvas.brother.com. Here is a picture of the Scan n Cut, yes it is pretty:
I spent the extra $$ on it to get the blue.  That I will tell you was a mistake because it is my understanding that the only difference between the blue and the red were the few extras that came with the blue.  So I spent about $100.00 to get the pens, pen holder, a CD with some art (which I didn't need), an extra mat. 200  extra built in patterns, 40 extra quilt patterns and the "Cut up this book" book that was not in the box.  I don't know how I am suppose to get the book but I will call the dealer and hope to get it.  So given the choice for a do-over I would get the red.  It scans great and traces outlines pretty good too.  Here is a picture of some rubber stamp die cuts:
The picture might not be great but the SnC did a great job on the cutouts.  You can adjust the border offset from zero going up but unfortunately there is no negative offset.  Which is something I really needed. For example if I had printed a sheet of tags (let's say 25 tags) and I printed a shape around each one so that the scanner would create the line I would then want to reduce the line via a negative offset.  As it is right now I have to scan in the page of tags with no outline and drop a tag shape on each one.  Which is doable but on the tiny screen is rather tedious.  Here is a picture of a little Hershey nugget holder I made.  I saw this on Inking Idaho.  Becky Roberts blog.  Visit her for great Stampin' Up! Ideas.  Here is how my version came out:
The SnC did a great job.
So being me, I had to explore a bit. Why what's this? Look hiding under the usb port. UMMMMMM,
Why it's a computer connection! Awesome, Let's plug in and see what happens.  Yup, my VAIO read it.  Even set up the connection.  Showed up as Brother Scan N Cut in my device menu. Not that I can do anything with it yet, but it is good to know that for sure Brother is going to HOOK ME UP!!
I love the SnC and my only complaint is that I can't see the screen.  I do notice that my 10 year old grand daughter doesn't seem to be having that problem. I also know in a matter of weeks I will be complaining that I can't get blades locally.  I have a feeling I will be trying to retro fit one of my other blade holder into the SnC.  This is why I love my ZING so much.  That baby seems to hold any blade holder.  Off to play and if the family is lucky I may even do some laundry.  But really who would want to walk away from the pretty blue machine.  Enjoy your day,
Lysa

Friday, October 11, 2013

The Scan N Cut is Here!!

Hi All,
Real quick I want to post a pic of the Basic Bow file that I uploaded to the Yahoo! Scan N Cut message board. Oh I don't like Yahoo at all.  This is why I refrain from yahoo groups.  Here is the pic.  I will upload the file to media fire too.
Hope you like it and here is the link to the mediafire  file:
http://www.mediafire.com/?yvuhsj5ehbed985
Hope this gets you all started using your SnC!
Lysa


Sunday, October 6, 2013

Breast Cancer Butterfly 2013

Hi Everyone,
Wow 2 posts in one weekend! I guess I do have my craft on!  I just wanted to show you the buttons I made for Sam's office.  I think the girls will love wearing them.  Here is a picture of the buttons:

No your eyes are not playing tricks on you.  I have been having so many problems with my HP Printer.  It is the 7500a and I am ready to throw it in the garbage.  All those graphics were printed through 4 different software packages and yet the gray printed green, The color pink changed with each try. I was getting frustrated! So I gave up and pressed the buttons.  They all look good in person.  Here is the graphic as a .jpeg for anyone who may want it.

I know, I know the font is black on the buttons.  That is because I just could not get it to color pink to print on the font due to printer problems.  I had to remove the shadow too!  Let me know it you want the graphic in black writing.  I will post it for you for sure.  Have a great "rest of the weekend"
Lysa

Saturday, October 5, 2013

Nothing Says It's Over . . . Like A Covered Pool!

Hi Everyone,
I know, I Know you all don't want to hear my end of summer rant. Everyone has been back to school for weeks. Vacation time is a dwindling memory. It's gone, It's O-V-E-R and has been for about a month.  No, Peeps, for me it ain't over till the pool cover is on! And sadly that happened this weekend.  No more crank'n the heater and watching the steam rise up to the cold air. It's done. Wait here is my sad face     ):
So just like that it is Fall, geeeze you guys it was 80 degrees yesterday here in Jersey! Here is my sad, sad picture:

True leaves are falling every which way and acorns are a plenty so the squirrels are happily enjoying their full belly's.  The house is glowing in all its orange glory and I have been working on Halloween favors.  We had a fantastic birthday celebration for Rory last weekend and a good time was has by all. So now we can really focus on the fall season and I can really start to work on Rory's costume for this year. Mummy! we are going mummy this year. Gothic of course!  The costume is in the house but it needs work. Mostly because she will freeze in it.  Samantha and I have our heads together about how to warm her up a bit.  Let's just say we will be buying lots and lots of gauze and doing some tea dyeing.  I also made my breast cancer butterfly for this years luncheon and here is a pic of that:
This graphic will be used for cupcake toppers and I will add the team logo before I go to print.  I made it using CA2 (as always) I have a tag line that I will format in a circle to go around the outside of the butterfly. I will post a pic when they are on the cupcakes.
And my big news is that the Brother Scan n Cut is coming to play in my craftspace. I hope to have it this coming week.  I also hope I have a lot to say about it.  Here is a picture of the cm550dx that is available from Brother sewing machine dealers:
 Now I need another cutter like I need a hole in my head but I am a Brother fan to start with so I had to have this baby.  I have to tell you it was not easy to buy.  There are 2 models available. This is the one that is available through a sewing machine dealer.  Go figure, all the quilters are now going to be cutting fabric with a machine (you go, Quilters!).  Me, I am hoping this is the answer to all my print and cut issues.  I could not find a dealer in Middlesex County, NJ so we had to take a bit of a trip. I paid in advance for a cutter that I never even saw work. (you go, Lysa! Let's just hope this is not another Cricut Imagine disaster!) Time will tell and let's just thank heaven that the Hubs did not file for divorce!! Stay tuned because I plan on trying to see if this cutter will play nice with my CA2 and MTC software.
I hope you all are having a great weekend and thanks for visiting!
Lysa

Sunday, September 29, 2013

Birthday Smiles!

Hi Everyone,
Just a quick check in to say Hi! We have been so busy here at the homestead I hardly have a moment to sit down.  First off the house is decorated for Halloween! I tried my best to thin it out a bit by only putting out my all time fav Halloween stuff!  Well it didn't work because every time I saw a corner I was back in the attic grabbing something to fill the space. While it does seem to look the same from year to year I still stand back and say "oh I love how that looks!"  Here is a shot of the bay window in the living room:
and the mantle:
All I can say is at least I have done away with the bales of hay and most of the faux foliage. Well since the homestead looked so nice we thought we would have the family over for Rory's birthday.  It was a great time. I had to make a little favor for the occasion (something simple as time was not on my side) Here is a pic of the favors:
Don't you love the tag line! Rory's 10 and you thought Halloween was scary!  I used Stampin' Up witches brew paper and the bread tag thinlet to create a fold over for a single Ghirardrlli chocolate.  Where those 10 years went I cannot tell you (Oh, but mirror in my bathroom sure can, can you say CROWS FEET!) We had a great celebration and today I thought it would be great to just sit and play. I thought I would play with some of the pictures that were taken yesterday.  When I saw a picture of Sam and Rory that was taken it reminded me of a picture I had from Rory's first birthday.  I wanted to bring them together on a digi page and here it is:
Surely the crows feet on my face are worth their weight in gold. I love these 2 girls more than anything and I wish for them that those beautiful smiles are on their beautiful faces everyday of every year of their lives. I use CA2 to create this page. Gee, I love that software!
I hope everyone is having a wonderful weekend. Thanks for stopping by and I hope you all are getting your Halloween on.
Lysa

Sunday, September 15, 2013

Let's Play What's Wrong With This Picture!

Hi Everyone,
Here I am with a quick post to check in and let you all know that I have gone completely off the crafty edge.  Yes, it's true. Here is a picture:
There, you can see for yourself I have totally stepped off the edge. What you don't see it?  Your thinking it looks just like your crafty desk, come on really! I can't remember the last time I had 3 seasons whispering in my ear at the same time. Yup, the Rainbow Loom (summer) bracelets are still going strong, I cut 20 more coffins for the nail file favors and made a bread tag foldover for my Board meeting favors (Hello Halloween) and just to keep me moving I had to play with my SU festive flurry stamps and thinlets (can you say Christmas tags 2013) I am just all over the place. Problem is I should have spent the weekend working on the mess that is still in garage from the room makeover (oh well, my car is in the garage and how bad would it be if Sam has to clean snow off of her car? hee -hee) And then there is that awesome huge (and annoying) pile of laundry and that kitchen floor (what to do, what to do) I know, I can spend another hour or so online looking for more information on the new Brother Scan N Cut die cutter that is coming out in October or better yet another hour searching pinterest for Vintage Halloween Goodness or maybe a trip to Five Below because I am running a bit low on lime green rubber bands.  Gee . . . . I am out of control . .  but the fact is I had an awesome weekend washing away my work life and playing in the craft space.  Like I always say "I 'yam what I 'yam and what I 'yam is a crafty good girl!"
Hope you all had a great and crafty weekend and have an awesome good work week for the crafty goodness is just a mere five days away!
Lysa
Here are some extra crafty good pics!
3 looms long so no extensions!
I just can't stop the LOOM'N!

Saturday, September 7, 2013

Halloween 2013 For The Work Peeps!

Hi Everyone,
It is an awesome fall day here in Jersey.  The air conditioner is off and the windows are open.  Even though I am a summer girl I must say with the horrible summer weather we had, today is just simply lovely.  So what did I do? Well, I never left the craftspace! Yes, it is true, on this beautiful day with so many chores to do I never left the room! But, with the windows open and the smell of Autumn in the air I was sure happy living in my own private Idaho (sorry Idaho, I just can't let it go). So, this years Halloween favors for the work peeps are proving to be one of my all time favorites. I do want to tell you that true to par I am no photographer as the following pictures just don't show these cuties in their true light! Please stay with me as I make a long story out of a quick and easy project. First my friend Joanne (Hi Jo!) gives me 2 spools of ribbon that went unused at a her niece's bridal shower. Joanne's niece (her sister Elle's daughter (Hi Elle))is getting married, probably as I am typing right now. Yup, right now! So anyway back at the point. They (Aunt, Mom,& the bridal party) decorated a party room at a winery for the bridal shower and they had some left over ribbon, and guess what? They thought of me! ME, yeah, Score!! Free awesome crafty ribbon goodness comes my way! Here is a picture of the free crafty goodness:
Ahh. . ..  almost 50 yards of crafty good white and opal mesh ribbon! So of course the first thing I thought was "gee, this is going to sit in my stash for a long time until my next wedding favor job".  Then I thought, "Maybe Christmas?"  I added the crafty good ribbon to the stash and was happy that someone thought of me.
Then, I went to work on Tuesday and my favorite AVON lady (Hi Donna) hands me my order. OMG!! happy dance as I open the bag to reveal the cutest Halloween emery nail files I have ever seen! Stay with me people, I am getting to the craft. So now I have awesome crafty ribbon and an awesome crafty favor and all I need to do is figure out how to package them up. Well here it is, my crafty good favor for the girls at work!
So cute, want to see what is inside? here he is:
He is the cutest nail file I have ever seen and the girls are going to love him!!!  Here is a few more not so great pictures of them:
I can't wait to give these out to the work peeps. I already called Donna to tell her to order me 10 more Avon files so that I have enough to send to Sam's office as well.  Pulling apart the white mesh ribbon that Joanne and Elle gave me created the perfect ribbon web effect for my little coffin fold overs and I just loved how the opal fibers catch the light just like a real web.  I really wish I had a better handle on photography so that you could see just how cute these little coffins are.  I hope you think they are as cute as I do.  And more importantly a shout out to Joanne and Elle on the big wedding.  I am thinking of you both and sending cheers, wishes and blessings to you both and to the Bride and Groom for a long, and happy life together.
Thanks for visiting,
Lysa

Saturday, August 31, 2013

Halloween 2013

Hi Everyone,
I was determined to get a Halloween post up before August ended.  In the past by the end of August I usually have 3 Halloween projects done and am ready to reproduce them on a large scale.  This summer I was so caught up in putting the house back together after the construction that my crafty good time was much less.  Then I got caught up in the whole rubber band thing and I am still in love with the loom! Well at least I have been making some black and orange bracelets.  I have always loved the bread tag shape that was taken from those little plastic tabs that hold the bread bag closed.  For crafting it has been around for a long time and Stampin' Up has re-sparked the trend with a thinlit die in this years catalog.  Of course all the SU peeps are making a box out of it.  I really wanted to make a version that has a narrow base and was cut in one piece.  And as always MTC made quick work of that. Here is my picture of the box I made.  It holds a fun size M&M pack really nicely.
Here is a picture of the .PDF file:
You can download the .PDF file here:
http://www.mediafire.com/view/1keyvf8gnd8j4l6/bread_tag_box_with_notes.pdf

The .MTC file is here:
http://www.mediafire.com/download/a1d088609chhunm/bread_tag_box.mtc
I hope you like this file and if you do please leave a comment and if you have any questions on this easy peasy box please don't hesitate to ask. Don't forget to check out my other free files by clicking the free file link on the sidebar.
Thanks so much for visiting and enjoy this unofficial last weekend of summer ):
Lysa

Monday, August 26, 2013

So Many Rubber Bands, So Little Time!

Hi Everyone,
I have one picture for you. I just had to show you all how obsessed we are with the Rainbow Loom.  3 girls and one week and this is what you have. And can I tell you is this does not include the bracelets we have given to our friends (and that was a lot!) Here is the pic:
Wow, that is a lot of bracelets! Check out the barrette I made in the center.  So much fun and a craft that has all the girls in the house talking and working together.  3 generations held together by a simple rubber band, now that's what I call Awesome Crafty Goodness! Thanks for stopping by,
Lysa

Monday, August 19, 2013

Crafty Goodness In Clear Plastic Pegs!

Hi Everyone,
I know it has been a long time between posts and so much has been happening that it is so difficult to find time to sit down to type!  I almost feel like I am so off grid that there is no getting back. I am happily finding joy in the new craftspace (so much so that I hate leaving the house each morning for the real world of work) but I do because I know it's the paycheck feeds the habit! And here it is the new habit. But wait the name sounds so pretty. It like a song to my ears. Are you ready? It's RAINBOW LOOM. How bad can a habit be if the word RAINBOW is involved?  So this is how it starts, You go to family reunion (which by the way way was AWESOME!) and one of the little peeps has this plastic peg loom that you loop colored rubber band over pegs and you use a crochet hook to lock the rubber bands into a chain.  Simply put you are using basic crochet to make a bracelet.  Ok, so the darn thing has been around since 2011 and even won a CHA innovation award.(How I missed that, I can't explain!)  So the 9 year old love of my life produced a bracelet for me in about 4 minutes flat using the darn thing so I get it in my head that this is the new 2013 version of my lanyard plastic lacing days. Here is a pic of the loom:
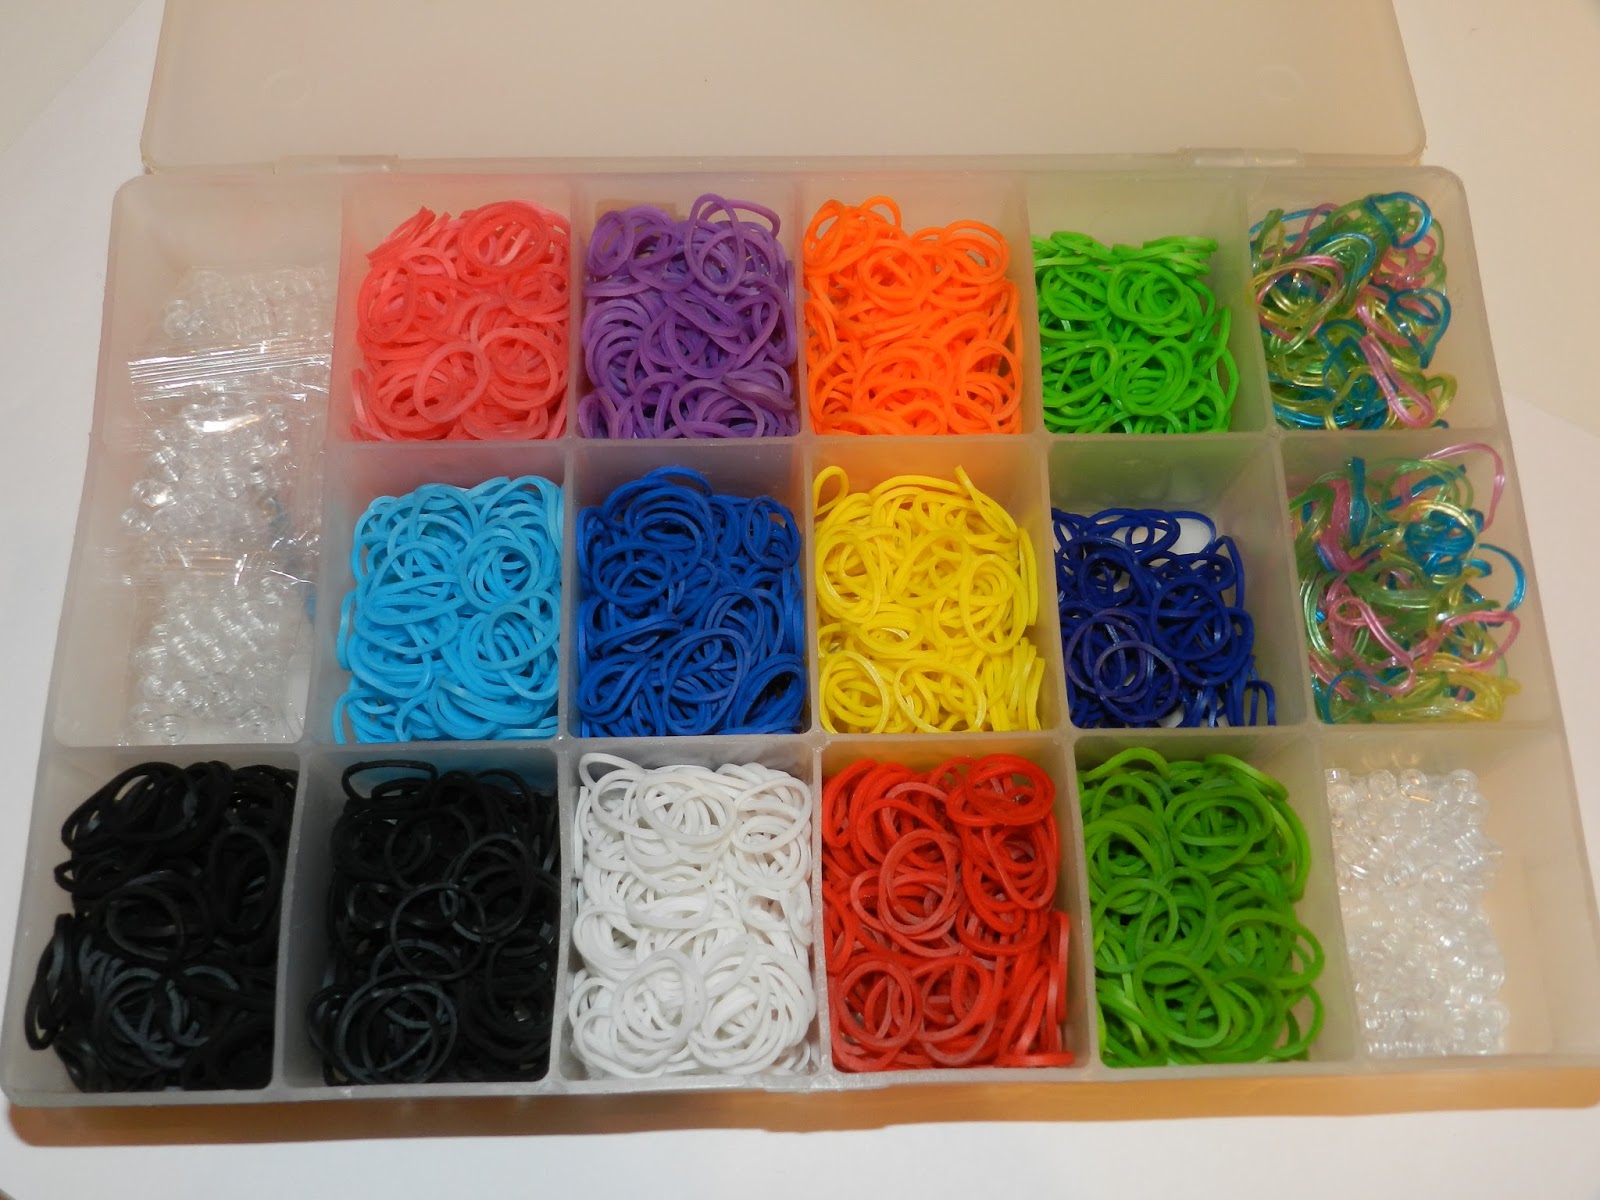
OMG, it was love at first sight for me.  I watched a young person teach another young person how to use this little plastic loom and that to me translated to my old camp days. I asked my cousin Peggy where she got it and she told me she picked it up at Shop Rite.  Really! At the supermarket!  It is clear to see I am now living under a rock, not just a rock but a big giant rock.  I was at my Shop Rite last night! I didn't see it. What is going on?  Was I so consumed with looking for what I needed in groceries for the family picnic that I (me, Lysa) looked right past this awesome crafty goodness right at my local supermarket! Sad, I know, but wait I still am truly an INSANE crafter because I sent dear Hubs back to Shop Rite at about 8:30 a.m. on Sunday in search of the thing.  He was back in like 15 minutes with a Rainbow Loom in hand.  I was happy, but not as happy the little girl.  Oh you had to see it.  She pulled it from his hands.  (here is where I get a bit corny as I don't know which was better her opening the box or me watching her open box) The look on her face was beyond anything I could imagine.  Her smile was surly ear to ear.  I never saw a kid open a box so carefully so as not to destroy any content that lay inside the box.  I was in heaven and so was Rory.  So now I get really obsessed, I got a 9 year old who is chomping at the bit to craft and a couple of dollars in my pin money wallet. So what would any insane crafter do.  Why that would be to send the Hubs back to Shop Rite to get me a RAINBOW LOOM of my own!  Yes, sadly it true I needed one too!  OK, so it does not end there.  Now we need a lot of the awesome colored bands.  Here is a picture of that:
 Really is 7200 rubber bands to many for any household to have. Well no because that is just my stash.  Here is the picture of my bands:
ohhhh, look at the pretty colors!!


and here is Rory's stash,

That is like another 7200 bands. Wow, we are ready to make bracelets for sure. You can clearly see we are head over heels in love with the Rainbow Loom.  Here is a close up of some of the bracelets Rory made yesterday:
 If you are looking for a gift for a 8 to 14 year old (or an oldie like me) we (Rory and I) highly recommend the Rainbow Loom as we love our new Awesome Crafty Good tool! Thanks for stopping by and Rory and I are off to make some bracelets.
Lysa

Tuesday, August 6, 2013

And Now, Some Awesome Crafty Goodness From the Hubster!

Hi Everyone,
You know I always have a bit of a winded story so I will do my best to keep it on the shorter side. So one day I am talking to my friend Kelly and she says "Have you seen this thing that Costco is selling?  It's like a storage cabinet that attaches to your door hinges!"  "It just hangs behind the door without those silly clips that go over the top of the door. It's called a Cabidoor" I say "No, what it looks like?" and sure enough she had a picture to show me. Here is the picture:
OK, being I was looking for gift wrap storage in the new craftspace I locked on right from the beginning.  That was until I saw the $160.00 price tag.  Not only that when I went online to research it a bit I saw it from Improvements catalog for a whopping $189.00!  Come on its cool and all but $189.00.  You know that is out of my price range for sure.  Than I thought well maybe I would ask the family for it for either a birthday or holiday gift.  I really did like it a lot.  So I showed the Hubs a picture of it and he liked it too.  But like me he thought the $$$ was a tad high.  He looked me in the eye and said "I think I can make it"  Now he really is the kind of guy that wouldn't say it if he thought he couldn't do it. And sure enough, don't you know I get home from work on Friday and he had made it!  I just love it. Here are the pictures of my homemade version of the Cabidoor.
He even made the bracket that attaches the cabinet to the door hinge
I used simple command hooks for my all occasion wrap
I just love how when the door is open (which it almost always is)  you would never know my gift wrap is happily living in a depth of 4 inches.  I am so happy that I am  using that space, in a small room like this no space can be wasted! Paul spent about $36.00 to make this awesome gift wrap storage for me. Here is my SHOUT OUT of thanks to Paul  for making the craftspace even better and for making me one happy crafty camper!  You da best Hubby EVER!!!
Thanks for visiting,
Lysa

Tuesday, July 30, 2013

My Favorite Craft'n Buddy

Hi Everyone,
I have been nothing but busy for what seems like months.  I turn around and here we are at the end of July.  Really, summer is so O-V-E-R!!  I know what August brings, it's all about back to school and beginning to notice that the sun is setting earlier and earlier each day.  I haven't even spent much time outside this year with all the cleaning an rearranging that went on inside.  When I am not at work I am trying to put the ole' homestead back together in time for the Fall season.  I have been trying to play in the new craft room so that I can get my crafty mojo going in time for Halloween.  New space, new mojo!  I did spend an awesome evening in the craftspace with my all time most favorite craftn't buddy last night.  Oh come on you know it was the dear granddaughter.  What Nonna wouldn't love a chance to play with her #1!  So here is how it went.  My friend Donna who is a major library volunteer has been keeping Rory in books since she has been four years old.  Lots and lots of books!  Donna knows just the right age appropriate book for any given age.  Donna even gets us prepared for the school's summer reading list.  I am telling you Rory's home library is awesome.  Now my friend Donna who is a co-worker is leaving my office (thankfully for bigger and better things) and it was time for Miss Rory to do something a bit more than her normal thank you.  In my conversation with Donna (who is a true book lover) it kind of came around to how much she love bookmarks (I have even made one for her).  It was easy to see that Donna would love and treasure a bookmark that Rory made.  So Rory and I set out to do just that.  Now, I am a self proclaimed control freak (and everyone who knows me knows it) .  So being that seems to be a problem I decided that I would take pictures of Rory making the bookmark so that everyone would know it was all her and I had little to do with it.  I did this because when Samantha (her Mom) was in Kindergarten and she submitted her battery powered motor into the science fair and none of the Judges believed that a 5 year old could make that type of motor herself, they disqualified her submission.  OK, so that was the right thing to do as there were no pictures of Sam making the motor (that would be, because I built it while she was sleeping and I didn't feel the need to wake her when she had to go to school in the morning) Really, I am kidding, well not really OK! Don't judge me, you know you did things like that too!  Enough, here are the pictures of Rory working hard on her gift to Donna.  I swear the only thing I did was plug in the laminator.
And here is her finished gift:
   Came out great and we can't wait to give it to Donna!  Rory is welcome in my craftspace anytime, it is only one door away from her room now and I am glad there is a space in this house that has all kinds of crafty good supplies to inspire someone to create something.  I am also glad I have a friend like Donna who travels through her life inspiring people by handing them a book so that they can take their imagination for a ride.  Thanks Donna, I am going to miss you in the officespace!
Thanks to you all for visiting,
Lysa

Saturday, July 13, 2013

Fun With Putty, I Like It!

Hi Everyone,
 So here I am in the new craftspace and I have been itch'n to get my craft on.  Right before I went off grid for the room redo I had bought some "Amazing Mold" putty from Hobby Lobby.  I never really got to play with it because I had to pack up all my supplies for the room change over.  So I thought it only fitting that I pull that off my crafty shelf to give it a try.  This putty is so cool, all you do is take equal part of the two compounds and mix them together.  Then you can press any shape you like into it to create a mold of the item.  There are hundred of youtube videos of  how people use it to create silicone molds of things.  I was fascinated and had to get some for myself.  I am so glad I did. The Amazing Putty was so easy to use and the result was, well AMAZING! It was simple to use, you take the equal parts of the two compounds, 1 part is white and the other is yellow. Just kneed them together until the colors are blended. Make a little mound and press a shape like a charm into the putty. Here are some pictures I took along the way:


 The working time on this putty is about 3 minutes to mix and it takes about 20 minutes to set up once you have pressed your item into it. I used the Stampin' Up simply pressed clay but you can use any air dry clay like Martha Stewart or even crayola clay.  You can even fill these molds with hot things like candle wax or UTEE. I see a lot of crafters use cold cure epoxy resin to make awesome charms and buttons.  Another bonus is that this product is food safe and can be used to mold things like ice, chocolate or butter.  Just be sure not to use the same mold for a food product that you have already used for a craft product.  I dusted my little scully with some perfect pearls and he is just to scary cute.  Next time I try it I will press the metal charm in a bit deeper so that I can get a better impression of the crossbones.  Also I will even off the clay so that I won't have all that extra to trim off.  This is why I love to play with supplies, it all about the playtime!  I found Amazing mold putty at Hobby Lobby for  $19.99, with my 50% coupon it was $10 bucks well spent. I have a feeling I will be carrying a little container of this around with me. I can see me on the beach pressing seashells and such.  Check out Youtube for some great videos and I am sure you will want to play with this putty too.  Thanks for visiting and have a great weekend.
Lysa

Monday, July 8, 2013

More Pictures Of The Craftspace

Hi Everyone,
Box after box, bag after bag, I am hauling supplies in to the new craftspace. I am now finding it funny as I am in the garage rooting through boxes.  I take something from one box, something from another and now all I have is a bunch of half filled boxes.  I am making headway and I have some pictures to share but I am now seeing clearly that all the crafty good stuff from downstairs is not going to fit into this room.  I am not sure how I will deal with the "left overs" yet but I am sure that I now can see what I did right and wrong when I planned this room.  What I did right was easy. I knew I needed a large working counter top. I knew I wanted narrow shelving above it for easy access to supplies I reach for all the time. I knew I wanted the shelving to be tall so that the out of reach area could be used for some decorative things.  I was successful with drawers.  I knew I wanted a lot of drawer storage. My score with the bins from Lowes worked out great.  I even started to label everything and I think the label came out great. Here is a picture:
I still have 11 more to label.  The units are filled I just haven't gotten to them yet. Not to waste any space, look what is hiding behind the 5 shelf unit by the door,
Yup, that's my crafty good mat storage for my digital die cutter.  A simple hook attached to the frame of the shelves with a zip-tie and all my cutting mats are in one place.
The Billy bookcases worked out well too.  I love my paper behind the glass and having everything on a shelf with easy access it just awesome.  They filled up quick and if I only had the space I could have used 2 more!!  Here is what they are looking like now:
Wow, they are maxed out and I still have a lot of crafty good stuff in the garage.  I wanted to keep the top of of the shelf for decorative things but all the drawers, baskets, and cigar boxes are filled with supplies. But I did save room for my camera collection. Here is a shot of that action:
 One would think a person with all these cameras could take some really cool pictures. Oh well, I am working on it.  See my Singer sewing table drawers?  Yup, that leads me to what I have done wrong. I love that table and since I couldn't fit it in the room, I brought in just the drawers. No worries I can re-attach them with ease as they just screw right back on.  The home office worked out and Paul even added a TV.
I love this space because I am away from the craft area.  It worked out just fine and I have a bit more work to do on it.  The other thing I did wrong was that there is no closed closet space.  I traded that for the home office area.  Now you all know some craft supplies are just a hot mess and with no door to hide them behind I am finding that a bit rough.  Also I really could have used a small bookshelf just for books and magazines.  I collect a lot of  media like manuals and such and I forgot to account for them.  Another other thing I missed was my gift wrap storage.  I am a huge gift wrap fanatic and I would have loved a gift wrap area or at least some dedicated storage. All in all I am on cloud 9 and am happy with all the work we put in to the 3 rooms. I know all of us are so happy with our new space and I am going to keep on rolling toward finally getting back to crafting. Thanks for visiting and hope to be back soon with a project instead of room redo pics.
Lysa